| Planning | Testing | Setup | Collapse | Gentoo | Top |
Websites for OpenSuSE installation:
In the box (by CanaKit):
Made in the UK
The instructions say to defer installing the heat radiators and the SD card until after the case has been assembled around the motherboard. Yes, the SD card probably sticks out too much, but jimc got his first Raspberry Pi before that instruction was added, and didn't have a problem working around the heat radiators while assembling the case.
Getting the motherboard into the case can be a bit of a challenge; be
patient. The case has three parts: top, middle and bottom. For
orientation, let's call the end with the USB ports the head
and the
other end, with the card slot underneath, the tail
. The side
with the power, HDMI and audio ports is the right
side. The GPIO
header (inside) is on the left
side. The leaves
in the Raspberry Pi logo end up toward
the head end. When you pick up the motherboard, the USB socket and RJ45
make a convenient handle. Avoid touching in random places, to avoid
electrostatic discharge, which can damage components.
To disassemble the case, start at the head end and pry the top up,
and bottom down, relative to the mid-deck. When removing the top,
notice how there is an air gap between it and the middle. The bottom
is held on by ball detents, and it will help to gently
move the
right side of the mid-deck outward in the vicinity of the ball
detent, to motivate it to let go.
Set the motherboard on top of the bottom cover, hooking it under the projections at the tail end. It should be level and centered.
On top of the motherboard at the left tail, there is a little white thingy about 6mm long, 3mm wide and 1mm thick which forum posts identify as the Wi-Fi and Bluetooth antenna. On the mid-deck there are two tubular projections that rest on the antenna as a spacer. One Amazon reviewer reported that he somehow got them so tight that they damaged the antenna. I believe this could happen if the motherboard were on top of its hold-down hook, rather than inside it. Whatever the cause, be careful in this corner.
Inverting the disassembly procedure, put the mid-deck over the bottom plus motherboard. It may be easiest to get the left tail ball moving first, then the right tail (between the micro-USB and HDMI ports), then the left head, and finally the right head, which is the hardest because everything is pulling on that corner. The balls will not be in their sockets, just floating. Now squeeze them all closed. Try for gradual level descent of the mid-deck.
Next, put the heat radiators on. They go on the CPU chip and the smaller one next to the USB ports (by SMSC). Forum posters ask, what is the correct orientation? Videos show both ways and it probably doesn't matter. Peel the blue film off the white layer, which is sticky on the bottom, and stick the thing to the chip.
While a bare motherboard is not supposed to need heat radiators, the case necessarily restricts airflow, and I suspect that the heat radiators help to get heat into the upper chamber from which the hot air can escape.
Put the top on. It doesn't close completely: there is an air gap of about 2mm all the way around. I think air enters here and leaves through the berry holes in the logo. The grabbers feel like they're a little wimpy in grabbing strength, Don't tape the top on, which would block the airflow. If I had trouble in this area (no trouble yet) I would tie a piece of dental floss around it.
The actual sequence that I followed was to try, unsuccessfully, to boot the SuSE installer. Then I installed the XFCE image, which booted but which was not able to communicate on Ethernet, and frequently but not always lost its connection to the keyboard, and sometimes lost video. Working through symptoms, I eventually traced the problem to excessive power being drawn from USB by the KVM switch I was using. I bought a powered USB hub, but it was deficient in intelligence, switching between hub and host power, which was fatal. I bought a different hub, and it had its own idiosyncracies, but I was able to get a combination that worked; your mileage will probably vary a lot. Update: I junked the hub and it worked; see the end of this section.
Powered hubs have two variants: with and without a diode in the uplink power line, so the host could send power to the hub for unpowered operation, but power cannot flow from the hub to the host. In the likely case that your hub lacks this diode, the two power supplies would end up connected in parallel, and one of them (the one with the lower output voltage) will provide no power, overloading the other, with bad consequences. Disconnect the Raspberry Pi's power supply and use only the (presumably bigger) hub supply.
There is another fly in the ointment, which I did not progress far enough to encounter: EMI (electromagnetic interference). One reviewer of a different brand of powered USB-3.0 hub said he had a lot of interference with his Bluetooth mouse and Wi-Fi in the 2.4GHz ISM band (his 5GHz Wi-Fi was not affected). Apparently a lot of USB-3.0 devices, including the hub being reviewed, emit electromagnetic interference in this frequency range which particularly affect the computer they are plugged into. Moral: only get a USB-3.0 hub if you are connecting USB-3.0 devices and if 2.4GHz EMI isn't relevant to your use case.
My conclusions from this debacle are:
Update: I retried the KVM switch before condemning it to a life of gathering dust in the basement. And it works! The key step was to get rid of the powered and unpowered hubs; the client USB cables (and video) connect directly to the client machines. The combination of Raspberry Pi and KVM switch draws 6 watts, which the Pi's power supply is able to deliver, including during booting. Moral: on a Raspberry Pi (and similar machines where the USB ports' power and the power supply are suspected of being connected in parallel), use only one power supply. If you have a power hog, get a seven port hub with a big power supply (even if you have only one or two clients), and let the RPi take power from it via the uplink. Assuming it lacks a diode to prevent this kind of power backflow.
A tidbit of information: When the RPi is connected to the keyboard via the KVM switch, occasionally the keyboard works on Grub's user interface, e.g. you can use up-down arrow keys to pick the boot command line variant, but most of the time the keyboard is inert until the operating system gets going. On the other hand, when the physical keyboard is plugged directly into the RPi it is reliably active during booting.
I'm feeling (without proof) this scenario: when each of the boot ROM, bootcode.bin, start.elf and U-Boot want to enumerate USB devices, it first does a USB bus reset, which disables power for all ports. Then, starting at the root port, it enables the port (with power) and waits a limited time for a ready signal. Then it sends Get Device Descriptor, and checks for whatever kind of device it's looking for. If it got a hub, it does this recursively. This procedure is documented for the boot ROM. The timeout is 2 secs (can be tweaked, for the boot ROM and start.elf). But when U-Boot looks for a keyboard, the timeout is probably short, and the KVM switch takes its time getting booted up. So the keyboard is not recognized.
I tried these interventions with no effect on the KVM keyboard:
Turn on USB booting for the boot ROM, with a 2 sec timeout.
Add a 2 sec delay in start.elf
(
boot_delay=x (in secs) in config.txt or (for SuSE) extraconfig.txt).
So far, I have never been able to put the OpenSuSE installation DVD on a
USB stick and boot it. Even with USB booting enabled, I'm pretty sure that the
ISO-9660 filesystem completely confuses the boot ROM. My next strategy will
be, rather than installing OpenSuSE off the DVD, to install an image and then
upgrade and reconfigure it. So which image do I want to download? Since I'm
eventually going to put XFCE on the machine, I'm going to use the XFCE image.
This description of installing an image is actually a composite of quite a
number of installation attempts. Do these steps on your laptop or desktop
computer: Knowing that I would have to repeat the installation procedure
several times, I made directories on the big computer. One has generic
files like my mini-homedir and a webserver template, while the other
has Orion-specific files like Orion's host keys and
SSH authorized_keys. These can be copied all at once into the image.
This will save a lot of hassle in subsequent setup steps.
Be paranoid; check the signature. You can use any convenient
identity; I'm using the root keyring. (This is different from the one
Zypper uses.) Move your SD card from the Raspberry Pi to the big computer.
Identify (carefully!) the device of the whole SD card. In my case (and
usually) the device name is /dev/mmcblk0 but check carefully that
you're not a special case. Then:
Copy generic and Orion-specific files into the image.
ssync is my wrapper for rsync that sets a more useful log format.
Having had a lot of trouble making the image work, I made a backup
copy of the partitions from the pristine image, for restoration and for
detecting what non-working files have gotten altered. I put the backup
directories in /s1/kvm/orion .
If you skipped the previous step and your partition is still
mounted:
The card now has two partitions, a FAT filesystem of 210Mb for
U-Boot and UEFI, and an ext4 filesystem of 3.84Gb for UNIX.
When first booted, it will provide a swap partition and will expand the
second partition to fill the remaining space, 31.5Gb (3.15e10 bytes).
Replace the SD card in the Raspberry Pi, connect anything that
was disconnected, and turn on power.
It boots. When shutting it down: I updated and installed DNS, /etc/hosts, /etc/ethers, etc. with
Orion's MAC address, fixed IP address, and appropriate hostgroups.
Updating /etc/ethers had to wait until I actually knew the RPi's MAC
address.
This is actually from a subsequent run of kernel 4.14.6 after
upgrading to current packages and successful post_jump. The 38.40 BogoMIPS (an underestimate).
We have BIOS 2018.01 01/17/2018 .
Switched to clocksource arch_sys_counter. This was the only
clocksource ever tried.
It's initializing KVM, i.e. this CPU has hardware virtualization.
raspberrypi-firmware soc:firmware: Attached to firmware
from 2018-04-16 18:16
It attempts to resume from disc, but since hibernation was not
done, there was no image to be loaded. (Not an error.)
USB initialization: The random number generator was initialized.
smsc95xx 1-1.1:1.0 eth0: hardware isn't capable of remote wakeup;
link is up at 100Mbps full duplex. (RPi isn't capable of sleeping,
hence can't be woken up either.)
Chrony startup: waitsync was botched. The RPi has no realtime
clock, but the time is saved when it goes down, and various maneuvers
are used to init the clock to the saved time as early as possible.
Even so, this will be slow by however many hours the RPi was shut off.
It takes a while for Chrony to be sure what time it is on the
timeservers, longer than waitsync was configured to wait. But
eventually it will step the clock (if chrony.conf has a makestep
directive, as it should).
PAM unable to dlopen(/lib64/security/pam_ldap.so). I'm going
to have to compile this from source. [Done.]
PAM adding faulty module: /lib64/security/pam_runscript.so
Wrong architecture, need to recompile from source. [Done.]
There is no sign of Bluetooth or Wi-Fi. The X-server failed to
start, but no indication of why in /var/log/debug or
/var/log/Xorg.0.log . Update: Permission problem on /var/lib/lightdm,
added it to /etc/permissions.local .
User ID is Change to your usual root password immediately. If you have a
pre-configured ordinary user, change its password too, and/or replace
with your own identity and password. The command is
rsync is not installed.
(Omit this step if you already copied this and similar files onto
the SD card when it was mounted on the big computer.) From a normally
configured host like your laptop, install /root/.ssh, which will
authorize root (and yourself) to get on with publickey auth, and which
will pre-authorize your usual host keys.
Wi-Fi has its needed driver (brcmfmac.ko) and firmware. It is up,
but has not been configured with an ESSID and password, so it is not
associated with any access point — and I'm not going to
configure it, since Orion has wired Ethernet.
/sys/class/bluetooth doesn't exist. Bluetooth is a can of worms,
so let's leave Bluetooth setup for a later section, and use the wired
USB keyboard and mouse.
At various points I chased my tail initializing the GPU in various
ways, but the configuration (/boot/efi/config.txt and extraconfig.txt)
from the image was the correct one. A permission problem with lightdm
was fixed; see above for an addition to /etc/permissions.local .
You are now ready to dig into the software.
This image is rather up to date, only 1 kernel
minor version behind the latest in Tumbleweed for ARM (4.17.13 vs. 4.17.14
on the other RPi, and 4.18.6 on x86_64). I did these steps to install my
desired software packages on Orion. slogin root@orion (from the laptop): It lets me on. It's using
the key agent on my laptop and /root/.ssh/authorized_keys that I
installed while the memory card was still on the laptop. I could also
have logged on at the console, but I can copy and paste to and from
this session from an xterm.
My post_jump script is going to install /etc/passwd, /etc/shadow,
/etc/group, which have my ordinary users plus root, all with
their current passwords.
Memory statistics: During initial boot, a swap partition was
added (0.5Gb) and the root partition was expanded to fill the remaining
space. 3.3Gb is occupied; 25.3Gb free; 1.6Gb in reserve; 30.2Gb total.
Do any needed snooping and hacking on the pristine image.
Run post_jump (on the distro master site, Diamond). It did a normal-looking reboot, up until it loaded the kernel and
initrd, whereupon it allegedly
Update: somewhere in reconciling boot files, I got Iris'
/boot/efi/EFI/BOOT/grub.cfg onto Orion, and it gives the UUID of the
root filesystem, which is on Iris, not Orion. Fixing the UUID got it
booting the OS from its own SD card. More details further on.
Orion passes checkout.sh, my suite of operational tests of many
runtime daemons. So the installation procedure is successful — with
a few issues that haven't yet been dealt with.
The next set of features to be set up are: I need to turn on onboard sound, and to evaluate whether
I am going to use it for audio playback, or a USB sound module.
The proceure to activate sound is documented: dtparam=audio=on in
/boot/efi/extraconfig.txt , and the onboard sound does basically work,
but it needs a more careful evaluation.
Also the HDMI audio channel has to be checked: it shows all the
signs of being functional, but I need to move the RPi to the monitor
(TV) that has HDMI audio.
The Raspberry Pi, as delivered, has no 3D
acceleration and renders licensed formats, such as MPEG-2, in software,
not on the GPU. I need to buy the extra-cost graphics license, and to
run graphics benchmarks with and without it.
The XMPP image has been seen to connect to the access
point and receive a DHCP address. I want to get this working, because
the upstairs audio playback node (which I very much want to modernize
with a RPi) has a pathetic MOCA connection: it works for audio, but
maintenance tasks are annoyingly slow because of the combination of
a slow CPU and slow networking.
The video playback node needs a Bluetooth keyboard
and mouse, for maintenance.
For audio playback I have my own software
based on GStreamer. All the relevant components seem to be installed
and just have to be checked. [Update: it's working fine.]
For video capture and playback I plan to install Kodi, assuming
that video playback is satisfactory.
I plan to have a third RPi as my office desktop machine. My needs
for CPU power are modest and the RPi is not wimpy so I expect this
will go well. Also I use a compute server across the net when
significant CPU power is needed.
The sound drivers have reasonable default names for the
cards, so you don't need to provide a udev rule to fix the names.
Look in /proc/asound/cards to find them. Avoid using card numbers because
they change randomly depending on the order of loading drivers. They are
ALSA for onboard sound, and vc4hdmi for HDMI on the graphics connector.
Look in /dev/snd/ or /proc/asound/devices to find the sub-device numbers;
normally it's 0; often it's 3 for HDMI; but on this device it's also 0.
You can do Use alsamixer (suggestion:
in a separate window) to set the volume and to un-mute the card.
Hit F6 and choose the sound card, then up/down arrow or PgUp/Dn to
change the volume. 'm' toggles muting; in the display This device has USB ID 0d8c:0103, conveniently named TurtleBeach. (But
in alsamixer the card name comes out as I connected the RPi to the TV, which has HDMI audio. It works,
but with a
Raspberry Pi doc page for sound gives several methods to configure the
sound; the incantation I chose was: The playback software (called Grivet) uses the default ALSA sink
(output channel), which it determines from $HOME/.asoundrc (where
HOME=/home/httpd/htdocs/grivet). The appropriate stanzas for using onboard
sound are:
With this configuration, Grivet plays the given MRLs, and quality is
good. There were no inter-track pops or clicks at all, playing a sequence of
tracks out of a M3U file, nor were there hisses or other extraneous noise
during the performance. (A forum post mentioned these problems; probably it
was for an older RPi model.) Sound quality appears excellent, limited by the
headphones and not by the PCM.
I have a I compared plugging the receiver into a hub, vs. directly into the RPi;
results were unchanged. No Ethernet packets were lost, unlike the case with
the Turtle Beach sound module. [Famous last words; on a re-test, it locked
up the USB bus.] Various software interventions produced
information plus the smoking gun described above, but no cure. So I used
a scorched earth policy: I moved the receiver to my gateway, an Intel box,
which is running 24/7 and which already has the software from a previous
incarnation of the sound playback system.
Bluetooth setup has been a lot of trouble. The goal of this setup phase
is to come up with a working non-wired keyboard and mouse (or touchpad) on my
audio-video performance node, Iris. But the setup work is being done first on
Orion, which is a lot more accessible. The following line of action
succeeded (sort of). The Raspberry Pi 3B has the Broadcom/Cypress BCM43430 Wi-Fi and
Bluetooth chipset, which needs firmware, specifically
/lib/firmware/BCM43430A1.hcd provided by the bcm43xx-firmware package;
my version is bcm43xx-firmware-20180314-3.1.noarch . (The RPi 3B+
needs BCM4345C0.hcd which the package also provides.)
Loading this firmware happens very differently from what I'm used
to in the Intel world: the Bluetooth side acts like or becomes a serial
TTY, and you need to use btattach from the bluez package (my version is
bluez-5.50-1.1.aarch64). It needs to hold the TTY open permanently.
I've written a systemd unit with the correct command line:
The Host Computer Interface (HCI) is not powered up by default.
I have a systemd unit to turn it on, but it's kind of cockamamie, so
I'm not polluting the Internet with it. The basic idea is: Finally you need to start bluetooth.service from the bluez
package.
For my Bluetooth management GUI I am using blueman
(blueman-2.0.6-1.1.aarch64). Start it by hand, or tell your desktop
framework (XFCE for me) to autostart it. It will put a Bluetooth icon
in your notification area (which you need to add to your taskbar).
The next step is to pick the wireless keyboard. Actually I have
several, for various incarnations of the playback node. The first one
I tried (not seriously for production) is a Think Outside folding
Bluetooth keyboard that I got in 2006, still working. Its advantage
is that it's known to work, and to use Bluetooth.
First step as a positive control: test it on my laptop. You often
see reports of botched pairing in forum postings and product reviews,
so the positive control is important.
Next I tried the same procedure on Orion. And wonder of wonders,
behavior was identical and the keyboard was operational.
Now comes the part that wasn't successful. This particular folding
keyboard is good for extensive writing jobs on a cellphone or tablet, which is
what I bought it for, but is not suitable ergonomically for controlling a media
node. I have two much more suitable keyboards: a Microsoft However, when either dongle is plugged into Orion it causes repeated USB
bus resets, and in particular the Ethernet NIC (which has a USB interface on
RPi) is kicked off the bus, and no Ethernet communication is possible until
the dongle is removed. This is a showstopper. The dongles work just fine on
Intel hosts. The situation is very reminiscent of what happened with the
Turtle Beach sound module.
One alternative fact might be that the dongles use Bluetooth and the
keyboards might be able to communicate with a Bluetooth-equipped host. This
is true for the Microsoft keyboard, but after about 10 years of service it
seems to have given up the ghost; though made discoverable it is invisible to
four different Bluetooth peers which are normally reliable. As for the FAVI
keyboard, it uses the Holtek/Shenzhen LogoTech 2.4GHz receiver, which is
not Bluetooth (and which is used by quite a number of wireless mice and
keyboards).
I bought a Jelly Comb B003B Foldable Dual Mode USB Wired & Bluetooth
Keyboard and Touchpad ($34.99 on Amazon). The battery recharges on USB, and it
also behaves as a wired keyboard if plugged in. It can fold up when not in
use. It's operational with the RPi's Bluetooth (wired too). It looks like
this keyboard is working out.
I did a survey of most of my USB modules, some of which are really
ancient. Order is best to worst, meaning whether it is accepted on the USB
bus. I did not evaluate its actual function, e.g. FAX modem, sound module,
Wi-Fi NIC, etc. The conclusion of this survey is that there is something really nasty
happening on the USB bus; some devices work fine, while some totally lock up
the USB bus and some even provoke daemon and kernel crashes. And in several
cases the behavior differed at different times on different RPi's. All of
these devices are satisfactory on Intel machines. I doubt that a
quick fix will be forthcoming. One of my use cases involves USB mass storage,
and I really hope that the rotating disc controller-enclosure will function.
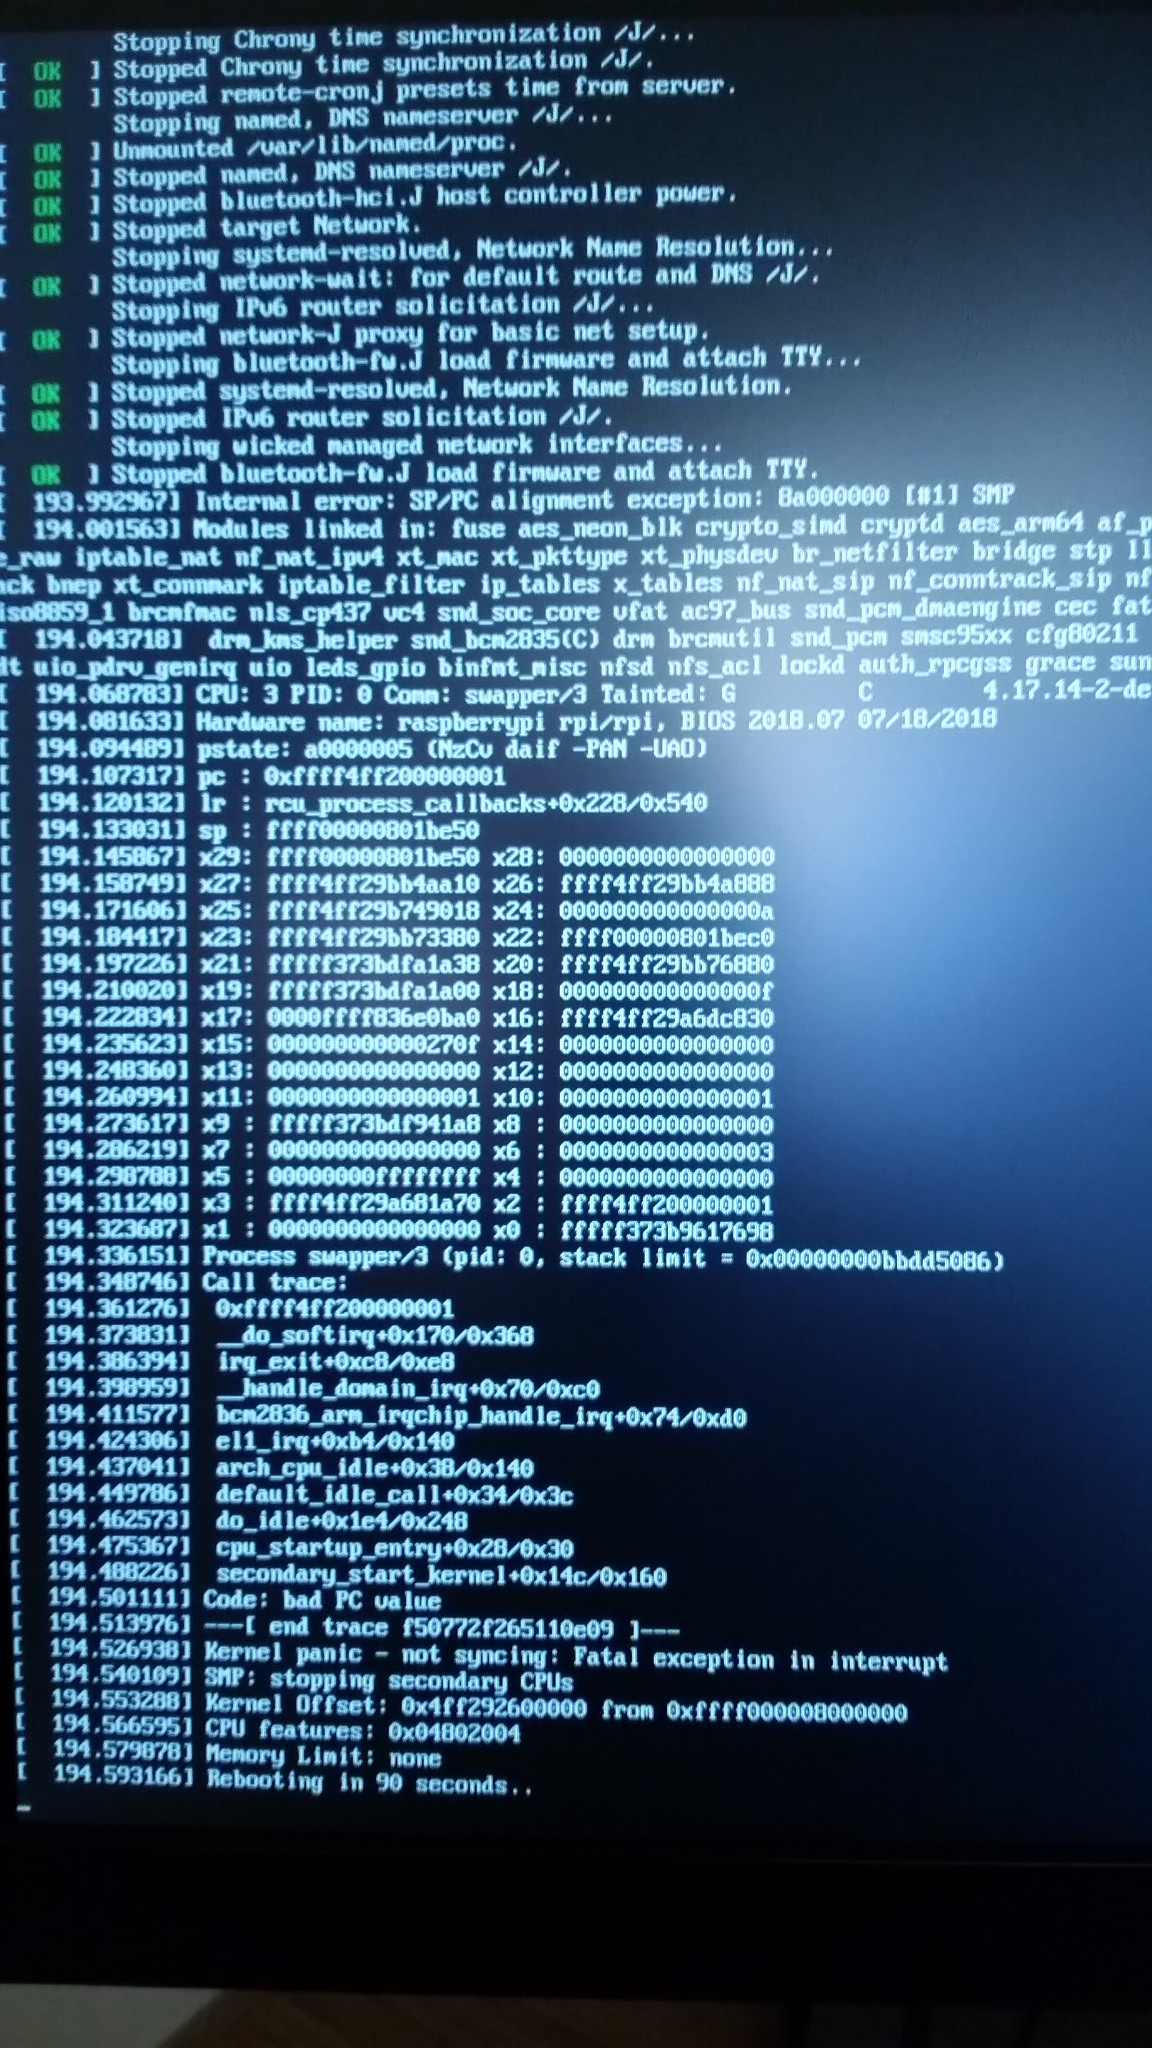
Another persistent issue with Bluetooth is that it sets off a kernel panic
when the host reboots or shuts down. The panic seems to vary randomly in
location and in the call trace. In the worst case, when it tries to shut
down the firmware loader, the host panics. In better cases it stops all the
daemons, announces that it is finishing the shutdown, and dies. My impression
is that the shutdown code (on ARM) transfers to EFI Runtime Services (on the
GPU) to do the actual shutdown or reboot, but this code has been trashed.
[Update: with kernel 4.17.14 the pattern has changed.]
I did some tests with Bluetooth on or off. The three services involved
were bluetooth-fw.J.service (uses btattach to load the firmware, by jimc),
bluetooth-hci.J.service (uses bluetoothctl to give the A pre-check gave these results:
I rebooted Orion repeatedly with all 3 services disabled. I did almost
nothing while the machine was up: just 20 reboots were performed without a crash. These anomalies were
encountered: Twice, Next, with all 3 services enabled, Orion was rebooted 10 times. Same as
before, I did nothing beyond It succeeded in rebooting four times, died twice after stopping the
btattach process, and died four times after using bluetoothctl to do
The major issue in graphics setup is to get the GPU (Graphics Processing
Unit) to do as much as possible of the work of rendering the image. The term
One major graphics issue is codecs for streaming video. Many
contentious issues surround graphic codecs and there are many codecs each
with its own strengths and weaknesses; I am certainly at a lower rank in
codec expertise. However, here's a simple overview of the codec issues on
the Raspberry Pi: The RPi is intended for students to hack, and therefore a low price
is essential. The RPi Foundation decided to not include GPU codec licenses
in the price of the whole RPi to make it more accessible to young
people; nonetheless, they negotiated this extra cost license scheme
with Broadcom for end users whose use cases require multimedia performance.
My main job in this sub-project is to purchase the license,
get the firmware loaded, run graphic benchmarks with and without the
firmware, and evaluate whether the RPi is going to be suitable for
video capture and playback (which several forum posters have reported
positively).
However, a key prerequisite is to be able to use the GPU, i.e. to get the
free codecs working. This turned out to be a major challenge —
actually a documentation issue. The GPU works on other distros (I tried
Raspbian and Gentoo-64), but after quite a lot of unsuccessful work including
transplanting the Gentoo boot files and kernel, I dug up this
forum post on Reddit about Raspberry Pi 3B graphics.
OP sdoconnell sdoconnell solved the problem! He has what he describes as a stuipdly
simple solution, which he found in section 1.2.5 of the
SLES documentation for Raspberry Pi.
Jimc's paraphrase and extension of his solution: I ran GLMark2 (SuSE package name glmark2), and the overall score was 74. I
believe this is the average of the framerates of the individual tests. Comparison of overall scores: Conclusion: With the magic incantation, 3D GPU acceleration will
work almost out of the box. The GPU speeds up performance by a factor
of about 4.4, whereas the laptop is about 100 times faster than a
software RPi, and a real game GPU would be faster than that.
You won't play modern video games on a RPi, but the GPU acceleration
brings important applications within reach, specifically video
performance, which has been mentioned favorably in forum posts.
The next step will be to purchase licenses for the video codecs
and try them out. Then, install Kodi.
For buying the licenses: Start at the
Raspberry Pi Foundation's website.
(I had trouble communicating with them via IPv6; temporarily suppressing
IPv6 in the browser helped a lot.)
Continue to BUY,
scroll down to the bottom and find the MPEG-2 and/or VC-1 Licence Keys.
The key is a 32bit integer in hex which is a hash (using a non-published
algorithm and initialization vector) of the codec ID and the serial number
of the specific RPi that's going to use the codec. To find this serial
number do To use the license(s), insert in config.txt (/boot/efi/extraconfig.txt for
SuSE) It's possible to use the vcgencmd command to check which codecs are enabled
(and other useful information and settings), but the instance on Raspbian is
for a 32bit operating system and libraries, and I was not able to compile it on
the 64bit RPi because there is assembly code that appears to be specific for
the 32bit architecture. According to
this HOWTO for Funtoo Linux (2018-10-16), the codecs that can be queried
are H264 MPG2 WVC1 MPG4 MJPG WMV9. To obtain the source code:
An important resource is going to be a collection of video clips, which
I plan to perform using VLC. I hit a few sources of video clips: Here are the URLs to the clips themselves. MJPG:
Toy Plane Liftoff (2.3 MB MJPEG), 4 seconds of MJPEG rendered
by Blender. Plays, no audio track. MJPG 640x480px, 4:2:2 YUV color
space, nominally 25fps.
H264: BBC Motion Gallery: Africa. Plays with audio. MPEG AAC (mp4a)
audio at 48KHz 32bit, H.264 MPEG-4 AVC, 1266x720px, nominal 24.4fps,
color space 4:2:0 YUV (ITU-R BT-709). Length 4.5 mins, 42Mb.
MPG4:
Morgen 2003-07-14 (17Mb DIVX), AVI stuffed with MPEG-4, 17 sec
time lapse of moon set and sun rise. Plays, no audio track.
MPEG-4 DIVX, 1920x1080px, nominal 25fps, color space 4:2:0 YUV.
Artifacts due to missing keyframes, possibly due to slow transport.
MPG2:
Wave Surfers, MPEG-2 PES. Plays with audio. MPEG-1/2 video at
1440x1080px, nominal 25fps, 4:2:0 YUV (ITU-R BT-709), plus MPEG-1/2
audio at 48KHz 32bit
WVC1:
Steam Train, plays,, no audio track, Windows Media Video VC1,
1440x576px nominal 25fps, 4:2:0 YUV color space.
WMV9:
Anime Battle, Windows Media 9 (1.4Mb) linked from Ching-Wan Yip's home page.
Plays with audio. WMA2 audio at 44.1KHz 12 bits/sample, WMV3 video
at 640x480px, nominal 30fps, 4>2>0 YUV color space.
Here are the outcomes from playing these files on various machines: They all play on the laptop (Intel, Linux) with VLC from PackMan.
Playing on the laptop with Parole (using GStreamer), all played,
except Playing on Android: this is Firefox but I'm almost certain that
it's using Android's generic media player as a backend. These played:
Big Buck Bunny H.264/MPEG-4 AVC in QuickTime; BBC Motion Gallery Africa
MPEG-4 AVC. All the rest did not play; Firefox offered to download the
file or to pass it to VLC. In other words, the mime-type was one
that the media player had not registered itself for, but VLC had. This
is not a real test whether the media player can play the file, though
not promising. The mime-type is provided by my webserver according to
the extension of the file (overridable but not overridden this time),
and on these test clips the extensions are probably appropriate.
Playing on the RPi without the codec licenses (video trial 1).
Performed with parole (GStreamer). I did these steps: Video trial 2 on the RPi: Same test but performed with VLC. The
only one that played was MJPEG (looked normal). MPG2 had a problem
involving excessive recursion(?) The others had the same complaints
about missing codecs as were seen with GStreamer. Several of the
required codecs appeared to be installed as dependencies of VLC.
I wonder if the OpenGL library tries to use the GPU codec
implementations, which fail due to not having the license, and it
doesn't fall back to software rendering.
Oops, got a problem. Consistently, when the XFCE desktop is being used,
something locks up after several minutes of use, generally just before I get a
video clip started. This symptom is very vague and unrevealing for diagnosis.
It is possible (in fact very likely) that the symptoms change when the kernel
is upgraded. Here are the facts known before targeted investigation.
Both Orion and Iris show the same symptoms when locking up.
Iris has been operational for months, rebooted only when the kernel
is updated every few weeks, and it plays streaming audio from another
host at least 12 hours per day. But no logins on the local console
until I started testing video, whereupon it had similar symptoms as
Orion. This shows the
innocence of the kernel, networking in general, the Apache webserver,
GStreamer, and PulseAudio.
On Iris the X-Server and the LightDM greeter are always running but
unused: no logins except for the tests complained about here. There
is a clock that updates once per minute. They never lock up if unused.
The vim editor crashes at random intervals. It does ncurses
in an Xterm, usually remote with slogin (ssh), but also local. Vim's
dynamic libraries: libacl libc libdl libm libperl libpthread libtinfo.
The teddy editor is completely reliable. It is written in tcl/tk
and almost always uses the X-Windows display piped in via ssh, though
when the local display is used, the finger of blame almost certainly
points elsewhere than at teddy.
A typical failing scenario is, I log in to the local machine (Orion
or Iris) using the LightDM greeter. It starts my XFCE session, which
is completely reliable on the various Intel hosts. I open one or two
Xterms, and sometimes Firefox (and sometimes not). I start some
non-threatening tasks. After 5 to 10 minutes the response time to a
command or a mouse click is very long. I find that the mouse cursor is
visible but not moving.
Command execution from the foreground session may continue to
completion; for example one time I was installing a package and it took
Similarly, one time I had In the failing state, neither the mouse nor the keyboard respond to
input: the cursor does not move, and keystrokes that would normally
have been shown in the Xterm do not appear. A later test reveals
that the client receives them; e.g. put the cursor over a frozen
xterm, type "echo Test File > /tmp/testfile", and the file appears,
with no visible effect on the screen.
No error messages appear in /var/log/debug, which collects general
syslog messages at the debug level. Update: there is a smoking gun
error message; search below for Check on .xsession-errors!
The failures occur in three contexts of the graphics driver:
without dtoverlay=vc4-fkms-v3d (no GPU acceleration), with this overlay
(OpenGL acceleration is confirmed), and with non-free codec licenses
installed, but despite repeated tries I was not able to actually
test playing non-free media becase the lockup occurred before I could
start VLC, retrieve the URL of the local media copy, and make VLC
play it.
The XFCE window manager has compositing on by default. I tried
turning this off: the freezes are still there.
What could be causing the symptom? Some ideas for investigation: In all of the following failure tests on OpenSuSE, the kernel command line
had cma=300M and /proc/meminfo reported CmaTotal: 307200 kB (which is assumed
without proof to represent 300*1024*1000 bytes). Swap space of
497972 KiB (total) was available. Bluetooth was off. XFCE's compositor was
on by defauilt with window shadows (unless I indicate below that I tried
turning it off). In reports of CPU percent used, 100% would mean hogging one
of the four cores, or the equivalent in multiple threads.
Two video tests that ought to set off the freezeup: First I run Firefox
and scroll as quickly as I can through 1.16Mb of text-only web pages. Then
I display 221 photo images (JPEG) each in a simple HTML page, as quick as I
can click Failure test 1: After the above 2 video tests (which did not freeze up),
I let it sit for 3.5 hours. The wcreensaver had the display off (DPMS).
I hit Shift, The display came on, and the mouse
cursor was visible on a black background. It moved following the mouse.
No interventions caused content to be displayed. The cursor changed shape
appropriately according to what it was over. Having memorized the window
placement, I focused on the XTerm and
typed Failure test 2, trying to provoke the failure promptly. I assume a BO is their jargon for video RAM in use. About 50Mb
is reported. The kernel command line (/proc/cmdline) says cma=300M.
A 1920x1080x32bit framebuffer pane uses about 8.3Mb each. The kernel
continuously reports complaints about Failure test 3: With cma=600M. Failure test 4. This will be on Raspbian (32bit). If it fails the same
way, this will prove that the problem is not specific to OpenSuSE, nor to the
Failure test 5: Repeating the same behavior on OpenSuSE. To make progress I'm going to need to re-create my Gentoo SD card and run
the tests there. See Gentoo64 on Raspberry Pi.
I spent three weeks trying to install Gentoo on the RPi. I eventually
got a complete desktop with XFCE and Firefox, but the package that provides
vc4_dri.so would not compile and I could not straighten it out; it appears
to contain assembly code specific for armv6 (32bit). I did learn a lot from
this experience, but the key goal was not met: to prove that the same death
spiral occurs on both Gentoo and OpenSuSE. Link to
history of Gentoo64 installation.
One thing I've learned with this bug: its manifestation varies according to
invisible details, and so it's necessary to repeat tests many times to get a
consensus. But in a re-test, the LightDM greeter continues to not hang up if
unused, but once I log on and start Firefox, it will behave normally for quite
a while but eventually does the death spiral. I've tried several programs
including Firefox, and when I exited from them, CmaFree went back to
approximately the value before they started. Nonetheless, so far the only
program that hangs is Firefox. Update: graphics will freeze up with just an
xterm, xload -update 2 (secs), the screensaver (only blanks the screen, DPMS
off, no eye candy), and the usual XFCE session infrastructure. But you have to
let it incubate: in the test where I was recording timestamps it took 5 hours
to freeze. Thus, although Firefox seems to make it fail faster, Firefox (or
another graphics-intensive program such as Chromium) is not required to freeze
it up. So there is no lonman ger ay reason for me to evaluate other web browsers.
I started a project to try as many graphical programs as possible.
Installing an Image
> gpg --import gpg-pubkey-3dbdc284-53674dd4.asc #--or--
> gpg --receive-keys 0xB88B2FD43DBDC284
> gpg --edit-key 0xB88B2FD43DBDC284
>> sign
>> trust #at level 3 or 4
>> save
> gpg --verify image-180905.sha256
Says: Good signature from openSUSE Project Signing Key
Says: image-180905.xz: OK. You need TWO
blanks between the hash and the filename.
> xzcat image-180905.xz | dd bs=4M of=/dev/mmcblk0 iflag=fullblock oflag=direct
> sync #When it finishes copying
> mount /dev/mmcblk0p2 /mnt
> ssync -a diamond:/home/post_jump/generic/ /mnt/ # jimc's mini homedir, httpd setup
> ssync -a /s1/kvm/orion/keys.orion/ /mnt/ # mostly host keys
#/dev/mmcblk0p2 is already mounted on /mnt
> mkdir rpi-180905-p2
> ssync -a /mnt/ rpi-180905-p2/ #takes about 2.5min
> umount /mnt
> mount /dev/mmcblk0p1 /mnt
> mkdir rpi-180905-p1
> ssync -a /mnt/ rpi-180905-p1/
> umount /mnt
> umount /mnt
systemctl poweroff
shuts down the OS and claims it is turning off power, but the red light
is still on and it's actually just halted. Upon power off the GPU will
blink the green light 10 times. Wait for it to finish before
disconnecting power. The need to wait is probably an urban legend, but
blinking assures you that the OS has done as much syncing as it's going
to and has given up control to EFI Runtime Services on the GPU.
Early Setup Steps
old
image has Tumbleweed from 2018-02-02 I think.
Boot is messy: something (u-boot I think) complains about missing
(something). Grub is themed but the keyboard is inert. (Update: the
KVM switch botches keyboard wakeup; a directly connected keyboard will
function from the beginning.) It boots the
default kernel but there are error messages during boot.
Update: the XFCE image dated 2018-04-30 is better behaved.
# lightdm homedir for Xauthority files.  Too bad you can't make this recursive.
/var/lib/lightdm                lightdm:lightdm 770
/var/lib/lightdm/.Xauthority    lightdm:lightdm 600
/var/lib/lightdm/.cache         lightdm:lightdm 755
/var/lib/lightdm/.cache/lightdm-gtk-greeter             lightdm:lightdm 755
/var/lib/lightdm/.cache/lightdm-gtk-greeter/state       lightdm:lightdm 644
/var/lib/lightdm-data           lightdm:lightdm 770
/var/lib/lightdm-data/lightdm   lightdm:lightdm 770
root
, password is linux
. These work on
the console greeter and SSH. Presumably also the console TTY(s) and
the serial cable, but these were not tested this time around. Some
distros, but not OpenSuSE, have an ordinary user pre-configured and
do not allow root to log in directly.
Raspbian's ordinary userID is pi
and its password is
raspberry
.
passwd $USER
.
> zypper install rsync
> rsync -a /root/.ssh orion:/root/
(Give the root password for the last time.)
Failed to boot both default and fallback entries
.
(There is no fallback entry specified in the Grub menu, so it couldn't
boot that.)
This has been seen before. I will need to solve this problem before
I can proceed.
Next Steps to Deployment
Sound Setup
aplay -D hw:ALSA,0 $sound.wav
. On a SuSE system they
provide /usr/share/sounds/alsa/test.wav .
00
means it can
play, while MM
means it is mute. Hit Esc (escape) to escape from the
mixer. Use speaker-test -D hw:ALSA,0 -c2 -t wav
and it will play
voice clips saying Front Left
and Front Right
until you give it
Ctrl-C. Volume 40 (percent) is reasonable for this test, and yes, the output
volume does respond to the mixer.
Audio Advantage MicroII
.) It
produces sound, but has two bad issues: First, it sets off repeated USB bus
resets, which kicks the Ethernet controller off the bus, and network
communication is impossible until the sound module is removed. This issue is
fatal. Also, the playback volume does not obey the mixer. I have a similar
module on another x86_64 machine, and after a recent kernel update (not sure
which one, possibly 4.16.1 and continuing at least to 4.17.3), it also ignored
volume from the mixer, so I'm calling it a driver bug. Overall, this USB sound
module is not going to fly on the RPi.
feature
.
The vc4hdmi device is for S/PDIF over HDMI, which I haven't tested yet.
The ALSA device, which formerly transmitted on the onboard audio, now uses
HDMI; I'm assuming without proof that the GPU converts incoming audio samples
to S/PDIF. Sound quality is good. So now I have to figure out how to bypass
this helpful feature, to get sound on the external speakers (via an amp).
amixer cset numid=3 1
where the last
argument 1 means analog, 2 means HDMI, and 0 (the default) means use HDMI
if the monitor
appears to have speakers. On SuSE, amixer is from the alsa-utils package.
Once this is set, save the current control values in
/var/lib/alsa/asound.state, from which the sound settings will be restored on
boot. One way to make this happen is systemctl restart alsa-restore
(using the service name from OpenSuSE), in the likely case that alsa-restore is
configured to run at boot time. Actually you could just wait until the next
reboot and let the settings be stored when alsa-restore is stopped naturally.
# Raspberry Pi onboard audio
pcm.rpi = {
	type	= hw;
	card	= ALSA;
	device	= 0;
};
ctl.rpi = {
	type	= hw;
	card	= ALSA;
};

# Without the '!' there was an error:
# ALSA lib conf.c:1016:(parse_value) pcm is not a string
# My guess is that there is a subsequent overriding value causing this.
pcm.!default	= pcm.rpi;
ADS Technologies, Inc. FM Radio Receiver/Instant FM
Music (RDX-155-EF)
, USB ID 06e1:a155. It provides 16bit signed
little-endian joint stereo at 48kHz. (Some software reports 96kHz because
there are two samples every 2.08e-5 sec.) It actually has 10bit resolution;
in other words the bottom byte has values of 0, 64, 128, or 192, and so is
easily recognizable. The player software Grivet
that worked on the x86_64 playback node also worked on the RPi with one very
annoying detail: occasionally bytes are dropped from the USB stream with a
probability of something like 1e-3 to 5e-3 (I didn't do actual statistics),
with the result that the bottom byte is flipped to become the top byte, and
the next channel's top byte becomes the bottom byte. This of course sounds
like nonrandom noise.
Bluetooth Setup
# bluetooth-fw.J service file for systemd
# Author: Jim Carter
show
; it lists the MAC addresses of all the
controllers, generally just one on a RPi.
Search for Devices
.
Wireless
Entertainment Keyboard 7000
, and a FAVI FE02RF-BL Wireless Backlit Mini
Keyboard with Laser Pointer
. (Discontinued in favor of the FE02BT-BL which
uses real Bluetooth). Each one comes with a USB dongle, which acts as a USB
keyboard and mouse independent of the host's software, so it functions at the
earliest stages of booting, e.g. in the Grub shell or GUI, or Intel BIOS setup.
I'm not stubborn in my solution; if the proprietary radio link works, I'll use
it.
Turtle Beach
/ C-Media
Inc., no bus reset but Ethernet went down momentarily, no
error messages. A second instance of this device behaved identically.
In a prior attempt this device caused repeated bus
resets and knocked out Ethernet.
WinTV-HVR
, something totally
hung, cannot reset the bus, all USB devices are non-functional.
power on
command,
by jimc), and bluetooth.service (starts bluetoothd, from the bluez-5.50
package). In testing, either all three were disabled or all three were
enabled and started, in the above order, at boot.
chvt 1 ; systemctl reboot
.
* indicates a 90 sec timeout for the swap device to become
ready;
this issue is not related to Bluetooth.
    1 2 3 4 5 (chvt 1 hangs the X-server, won't flip even if X-server stopped)
    6* 7 8 9 10* 11* 12 13 14 15 (chvt 1 hangs again)
    16 17 18 19 20*
chvt 1
locked up (something); whether or not the
X-Server was running, it could not complete the transition to VT1 and keyboard
and mouse events did not appear on the screen. Four times, during initrd
execution there was a start job for /dev/mmcblk0p3 (swap), which continued
until it timed out about 90 sec later. Jimc's interpretation: a device unit
waits until the device becomes ready, but the man page is not clear what
happens if it is already ready, which I suspect is the case. This issue is
not related to Bluetooth.
chvt 1 ; systemctl reboot
, and in
particular, no Bluetooth devices tried to connect.
H = panic after stopping bluetooth-hci.J. (At the end of the process.)
F = panic after stopping bluetooth-fw.J.
1 2H 3H 4F 5F 6H 7H 8* 9* 10
power off
. In a change from previous experience with the 2018-05-11
image (now using 2018-08-13), it consistently got a fatal exception in
interrupt
. Here's a screenshot:
Graphics Setup
hardware acceleration
is often seen but is a misnomer since the GPU is
actually a fully programmable compute system with multiple cores each with an
ALU (arithmetic and logical unit) optimized for efficient execution of
typical graphical primitive computations. The GPU handles the whole boot
process until the kernel is ready to run. (On SuSE the kernel
is
u-boot.)
3 months ago
(2018-07-xx).
On 3 RPi's he has OpenSuSE Leap 15 and Kodi, but the frame rate
is 3 to 5 fps, which is unwatchable.
experimental
. An issue is described
below, and as of 2018-09-xx to present (2018-12-xx), GPU acceleration
with this problem really would not be acceptable in the SLES context.
[Update: comments from a SuSE distro manager indicate that since
Mesa-dri-vc4 is also not installed by default, they may or may not be
going to get rid of 20-kms.conf.]
fake
KMS) works
better for streaming video and that's what jimc is using.
Conditionals
draws a pleated surface and demonstrates
various programming techniques.
Function
and Loop
draw an intricate background
clipped by a pleated surface.
dmidecode | grep Serial
; only the first core has one.
They will deliver the licenses by e-mail; when I did it, delivery was in
about 3 hours, but it probably depends on whether you send in your order
during working hours in the UK.
decode_MPG2=01234567
(not MPEG2) and/or
decode_WVC1=fedcba98
. Then reboot.
git clone https://github.com/raspberrypi/userland.git
.
Plays
refers to being
played with VLC on the Intel laptop.
Morgen
consistently makes it dump core. Update:
VLC on Orion won't play Morgen
, complaining about excessive
recursion. (But VLC on Intel succeeded in playing it.)
Death Spiral
forever
and no sign of progress or completion was visible. But
I was able to log in via ssh, and discovered that the package was
installed.
top
running in another local xterm,
and it continued to update the screen. No unusual processes were
active, and CPU and memory utilization was unremarkable. This shows
that the X-Server was not catatonic. No error messages are ever seen
in /var/log/Xorg.0.log.
drm:vc4_bo_create
.
(xfwm4:2901): xfwm4-WARNING **: 12:28:00.091: XSync timeout for client "openSUSE search - Mozilla Firefox" (0x3200011)
And another one for Mahjongg.
(xfwm4:2901): libxfce4ui-WARNING **: 00:02:00.456: ICE I/O Error
(xfwm4:2901): libxfce4ui-WARNING **: 00:02:00.457: Disconnected from session manager.
(And similarly for xfsettingsd xfdesktop xvce4-panel)
etc.
top
for a long time and see if the X-Server does or doesn't
go catatonic eventually. This is a 2D test.
Next
.
echo Test File > /tmp/testfile
, and the file appeared (I used
a ssh session to see it). Still,
only the cursor is visible. I tried killing xscreensaver, didn't help.
I killed xfce4-session; the session was killed, the X-Server was restarted,
and the greeter session was started… Invisibly. Enough of this;
I rebooted. I should have tried flipping VT's; during the reboot when it
flipped to VT1, that was visible. [Update: flipping VTs would not have helped;
VT1 is visible and VT7 continues to misbehave.]
top
was running in one XTerm. X-Server 1.5% to 2% CPU with
occasional spikes as high as 24%, nothing happening on the desktop to
cause it. Top: 1.3% CPU, steady. This was without Firefox. Firefox
0% CPU when doing nothing.
Top
is not redisplaying. Last screen shown says
97.0% idle, X-Server 9.5% CPU 4.6% memory. Cursor moves but mouse
clicks have no visible effect in Firefox or the Window Manager
titlebar or the panel.
DISPLAY=:0 XAUTHORITY=/run/lightdm/root/:0 xwd -root > /tmp/root.xwd ;
convert /tmp/root.xwd -resize 800x450 /tmp/root.jpeg
and in the
resulting image the new web content could be seen on Firefox's window
which was part of the root window; in other words, the mouse click was
received by Firefox and the new rendered image was received by the
X-Server, and was painted on one of the framebuffer panes, which was
not the one that was being displayed.
Oct 22 12:28:22 orion kernel: [52199.009645] alloc_contig_range: [1d800, 1eb00)
PFNs busy
Oct 22 12:28:23 orion kernel: [52199.799516] [drm:vc4_bo_create [vc4]] *ERROR* F
ailed to allocate from CMA:
Oct 22 12:28:23 orion kernel: [52199.799538] [drm]                         kernel:   8100kb BOs (1)
Oct 22 12:28:23 orion kernel: [52199.799546] [drm]                            V3D:  49996kb BOs (144)
Oct 22 12:28:23 orion kernel: [52199.799556] [drm]                     V3D shader:    248kb BOs (58)
Oct 22 12:28:23 orion kernel: [52199.799563] [drm]                           dumb:     48kb BOs (3)
Oct 22 12:28:23 orion kernel: [52199.799573] [drm]                total purged BO:    512kb BOs (1)
Oct 22 12:28:23 orion kernel: [52199.799594] vc4_v3d 3fc00000.v3d: Failed to allocate memory for tile binning: -12. You may need to enable CMA or give it more memory.
Oct 22 12:31:15 orion kernel: [52372.329132] alloc_contig_range: 551 callbacks suppressed
Oct 22 12:31:15 orion kernel: [52372.329144] alloc_contig_range: [17c80, 17d00) PFNs busy
alloc_contig_range PFNs
busy
. /proc/meminfo shows CmaFree: 30304 kB.
DISPLAY=:0 XAUTHORITY=/run/lightdm/root/:0 xlogo
: no error
messages, but the window does not become visible.
top
. In another,
tail -f /var/log/debug
. Also do tail in root's SSH session.
In the third, grep Cma /proc/meminfo
.
top
;
fluctuations and uneven variations do not match up with visible
activity. This continued for 1 hour exactly and did not lock up.
Oct 22 18:14:00 orion kernel: [ 4861.637634] [drm:vc4_bo_create [vc4]] *ERROR* Failed to allocate from CMA:
Oct 22 18:14:00 orion kernel: [ 4861.637658] [drm]                         kernel:   8100kb BOs (1)
Oct 22 18:14:00 orion kernel: [ 4861.637666] [drm]                            V3D:  50036kb BOs (145)
Oct 22 18:14:00 orion kernel: [ 4861.637673] [drm]                     V3D shader:    244kb BOs (57)
Oct 22 18:14:00 orion kernel: [ 4861.637683] [drm]                           dumb:     48kb BOs (3)
Oct 22 18:14:00 orion kernel: [ 4861.637692] [drm]                total purged BO:    512kb BOs (1)
Oct 22 18:14:00 orion kernel: [ 4861.637713] vc4_v3d 3fc00000.v3d: Failed to allocate memory for tile binning: -12. You may need to enable CMA or give it more memory.
C
compiler. But it is unlikely to fail because a lot of people have
been using Raspbian and would have reported a failure like this.
top
, and Firefox.
available
memory.
This time CmaFree had a steady decline from 262776 kB to 46364 kB.
And it froze just after finishing the task. CmaFree bottomed out
at 29956 kB, 5 mins later. In the frozen condition, the mouse cursor
moves and changes shape according to what it's over, but the window
content no longer changes, ever. Rebooting.
Returning to the Death Spiral
Picking a Web Browser
Hung
means that CMA free memory decreased in a death spiral.
Leaked
means that CMA free memory did or didn't return to approximately
the start value when the program exited.
| Name | Hung? | Leaked? | Libraries | Description |
|---|---|---|---|---|
| xterm | No | No | libX… | Terminal emulator |
| evince | No | No | libgtk-3 | PDF viewer (1 crash, 1 success) |
| ristretto | No | No | libgtk-x11-2.0 | Image viewer (OK) |
| AisleRiot | No | No | libgtk-3 | Solitaire game (OK) |
| gbrainy | No | No | In Mono | Brain teasers (OK) |
| Mahjongg | No | No | libgtk-3 | Tile matcher (missing tiles) |
| gnumeric | No | No | libgtk-3 | Spreadsheet (OK) |
Since a quick fix is unlikely for the death spiral issue, and since Firefox is apparently doing something that sets it off, more so than other programs, if I want to use the Raspberry Pi in a desktop role, I'm going to have to use other than Firefox. So which web browser shall I pick? Of course the choices will have to be tested long-term to see if they also set off the death spiral.
The main competitor to Firefox is Google's Chrome, apparently now
surpassing it greatly in market share. This program has extensive integration
with Google's information ecosystem, both bringing Google services such as
Gmail and Google Documents to the user, and bringing to Google unknown but
probably extensive intelligence about what the user is doing, that can be
monetized. The foundation is called Chromium and is open source (0.13% market
share), and Google's helpful user experience augmentations (including the H.264
codec) are believed to be separate. I used Chromium for a while several years
ago and decided that I liked Firefox better. I am inclined to put Chromium at
the end of the line, for consideration as the replacement web browser. So I'm
going to consider lesser
browsers and am going to have to decide which
features and aspects I am willing to give up.
Market share of major web browsers, 2017-05-xx (graphed back to 2009),
from StatCounter,
presented on Wikipedia. Major
means over 2% at any time in this
interval. The metric is page loads including linked items such as style
sheets and advertising, summed over all
webservers.
IE, Microsoft Internet Explorer (probably includes Edge) (excluded, Linux required)
Usage Share of Web Browsers on Wikipedia. This page has lots and lots of tables showing market share in different ways, and a discussion of biases and inaccuracies in collecting these statistics. I'm showing here the distribution of page loads (vs. unique visitors) summed over all Wikimedia sites (i.e. Wikipedia and friends). Wikimedia pages tend to not have voluminous showers of linked files, nor do they have any advertising, so this data is likely to be more comprehensible and reliable than others. The table is dated 2018-10-xx (it's the first one on the page).
A quick look at non-major browsers does not reveal promising candidates. The problem with a non-major browser is that as usage dwindles it is likely to become extinct, leaving me with the need to do this selection again.
UC Browser is completely unknown to me, and I'll be interested to find out what it is. A map showing the majority browser by country has UC in the lead in India and Mali. (And Firefox in Germany and a few Caribbean islands, Opera in most of Africa plus Uzbekistan, and Chrome everywhere else.) Wikipedia article about UC. It was first released in 2004 by UCWeb, a subsidiary of the Alibaba Group, a major Chinese e-commerce company. It has a bad reputation for security. I'm dropping this one like a hot potato.
It looks like all major browsers are excluded for the RPi role except for my last choice, Google's Chromium. Now I'm installing and testing it. Yes it is available for aarch64. 191Mb installed.
Nov 21 13:42:56 orion kernel: [ 3407.350150] [drm:vc4_bo_create [vc4]] *ERROR*
    Failed to allocate from CMA:
Nov 21 13:42:56 orion kernel: [ 3407.350168] [drm] kernel:      8100kb BOs (1)
Nov 21 13:42:56 orion kernel: [ 3407.350176] [drm] V3D:        43148kb BOs (221)
Nov 21 13:42:56 orion kernel: [ 3407.350183] [drm] V3D shader:   336kb BOs (81)
Nov 21 13:42:56 orion kernel: [ 3407.350190] [drm] dumb:          48kb BOs (3)
Nov 21 13:42:56 orion kernel: [ 3407.350199] [drm] total purged BO: 212kb BOs (53)
Nov 21 13:42:56 orion kernel: [ 3407.350216] vc4_v3d 3fc00000.v3d:
    Failed to allocate memory for tile binning: -12. You may need to enable
    CMA or give it more memory.
Nov 22 01:15:25 orion kernel: [34890.524661] [drm:vc4_bo_create [vc4]]
    *ERROR* Failed to allocate from CMA:
Nov 22 01:15:25 orion kernel: [34890.524683] [drm]     kernel:  8100kb BOs (1)
Nov 22 01:15:25 orion kernel: [34890.524691] [drm]        V3D: 26904kb BOs (121)
Nov 22 01:15:25 orion kernel: [34890.524699] [drm] V3D shader:   272kb BOs (65)
Nov 22 01:15:25 orion kernel: [34890.524706] [drm]       dumb:    48kb BOs (3)
Nov 22 01:15:25 orion kernel: [34890.524713] [drm]     binner: 16384kb BOs (1)
Nov 22 01:15:25 orion kernel: [34890.524721] [drm] total purged BO: 8kb BOs (2)
Nov 22 01:15:25 orion kernel: [34890.524741] vc4_v3d 3fc00000.v3d: Failed to
    allocate memory for tile binning: -12. You may need to enable CMA or
    give it more memory.
death spiralbehavior is consequential damage when the breakage, whatever it is, prevented CMA memory from being freed, which it would have been before the hang.
My conclusion here is that Chromium sets off the death spiral just like Firefox does. The good news is, I don't have to deal with Chromium any more. The bad news is that I don't have any web browser at all. [Update: graphics can freeze up with no web browser and no other major graphics program, and graphics can freeze with no death spiral and in fact no visible effect on CMA memory at all.]
This is a known bug. cma_alloc: alloc failed #2680 (2018-09-12, OP cbxbiker61). I posted a bug report with OpenSuSE (bug 1117095, 2018-11-22) asking for help coming up with a non-freezing kernel.
My goal in this step is to duplicate the mitigation steps in the above bug report, and to come up with a vc4 driver and/or whole kernel that does not freeze up. I will alter /etc/default/grub so my hacked kernel is preferred over more recent distro versions. I will have to keep a close eye on the kernel changelogs, and when a security issue turns up that affects me, I will have to rebuild my custom kernel. The commit reversions listed are just band-aids, and let's hope that the real bug is fixed soon. If I could find the issue that would be great, but I think that will be very unlikely.
OP cbxbiker61 (2018-09-12) runs Kodi on a RPi (doesn't say the model or the distro). Respondent HiassofT runs LibreELEC/Kodi on RPi 3B+. This was kernel 4.14.68. Respondent detule proposes reverting both of these commits (they seem to be identified by the first 32 bits of their hash). HiassofT agrees.
Near the end on 10-06, HiassofT identifies
We have kernel 4.18.15. Plan: to check out the 4.18.y kernel source, up to the latter commit, and build it. Now here's a question: are all these commits affecting core kernel functions, i.e. memory allocation? That seems very plausible. It would be nice to be able to just hack the vc4.ko driver, but I doubt that's going to happen.
The checked-out tree will go on Orion (the RPi) in /scr/deathspiral/ . I'll use giggle, a graphical front end for git. Executing as myself, not root.
The Linux Page(OP Alexis Wake, 2018-10-06) tells how to do this.
Clonebutton will become active. Hit it. Be patient, kernel source is big. There's a command line option to clone only the HEAD, but that's what I don't want. 2.0Gb downloaded. Then it indexes stuff. Then the RPi locks up.
WARNING: CPU: 1 PID: 1782 at drivers/gpu/drm/vc4/vc4_plane.c:781 vc4_plane_async_set_fb+0x7c/0x88 [vc4]. There was a complete trace but I couldn't see the actual error message. A classic death spiral ensued and the display froze after 4 mins with the message
vc4-drm soc:gpu: failed to allocate buffer with size 16777216.
Clearly kernel 4.14.84 does not have the fixes described. Trying the same thing with 4.18.y.
realbranch. git show 3a1a31d7 does not find it.
It seems like whenever my disto does a major version upgrade, the greeter gets horked. The greeter is the thing on X-Windows where you give your loginID and password, pick a session type, etc. It is a major component of the display manager, which typically on desktop Linux starts the appropriate X-Server on the host's physical monitor, then invokes the greeter on that X-Server, obtains the user's loginID and password (or other authentication mechanism), and if authentication succeeds, starts the selected X-Session. Some display managers can also deal with displays on other hosts such as X-Terminals or thin clients.
By now I've tried every common display manager, and several obscure ones. I'm currently using mdm (Mint Display Manager). But it is not available in Tumbleweed for aarch64. Do I want to recompile it from source? It has its idiosyncracies, and the default greeter in the XFCE image is LightDM. What if I revert to LightDM?
Several years ago I used the LightDM Webkit greeter and had a nice theme
meeting all my requirements, but at that time some part of it was a bit flaky,
and it succumbed to a bug fix
in a new version. So I moved on to the
next choice, mdm.
My requirements for the greeter are:
pick from listgreeter style, which provides a dropdown list of eligible users (generally with avatars, i.e. face photos) which you can pick with the mouse. This style is particularly useless at work, where there are over 200 users.
Customizing the LightDM GTK Greeter, OP ArcticDog (2012-02-08). As of 2018-06-25 jimc is using lightdm-gtk-greeter-2.0.5 which has several differences in configuration parameters from the version ArcticDog used.
To suppress the user list, in /etc/lightdm/lightdm.conf in
[SeatDefaults] add a command: greeter-hide-users=true
.
SuSE doesn't provide this file, taking all defaults.
[SeatDefaults] is now deprecated and you should use
[Seat:*] (all seats) instead.
According to /usr/share/lightdm/lightdm.conf.d/50-suse-defaults.conf by default it starts the X-Session by execing /etc/X11/xdm/Xsession (good).
To set the background, in /etc/lightdm/lightdm-gtk-greeter.conf in [greeter] change to background=/path/to/photo.jpeg . A range of common formats is acceptable; I didn't investigate how wide that range is.
In ArcticDog's version, /usr/share/lightdm-gtk-greeter/greeter.ui has the UI definitions (duh). This file is no longer available for hacking.
Wadsok (2013-06-01) asks how to move the login box. Chuck Harris
(2016-10-15) replies, in the [greeter] section, uncomment the position
line and have it say position=top
or whatever geometry. He
doesn't know what all the possibilities might be.
In another forum post I stumbled on a tidbit: the default position
is position = 50%,center 50%,center
. To get my preferred
position I'm successful with position=0%,left 100%,bottom
.
Apparenty blanks are legal around the '=' sign. In another context
(tcl/tk), the percents specify a point on the screen (and could be
expressed as keywords), while the keywords specify a point in the
window being positioned that should land at the given screen location
(and the keywords could also be percents).
I also tried lightdm-slick-greeter-1.1.4 . But it is strongly oriented to the user list, and I could not get it to show my background; it wanted solid black. So I went back to lightdm-gtk-greeter. Useful lessons learned:
show_noneis a pseudo-group with no users in it. The
group-filterparameter appears to do nothing on lightdm-gtk-greeter.
Sonya. Robinw0800 replies showing his /etc/lightdm/lightdm-gtk-greater.conf and there's a tidbit:
position = 50%,center 50%,center. And it's apparently legal to have blanks around the '=' sign. Also
panel-position=top(or bottom).
position=0%,left 100%,bottomand it actually works!
Procedure to install:
theme-name=Adwaita-dark(vs. Adwaita unmodified) did the trick for me.
Nightmare! On the last and most insignificant host that I was switching over to LightDM, the greeter would not appear. The ancient monitor is driven via a DVI cable that has working VGA lines. After a ridiculous amount of troubleshooting, I found these facts:
primaryscreen, but I couldn't make the greeter appear on that screen.
A quick and dirty fix was to connect from the physical HDMI port on the
host to the DVI port on the monitor, using an adapter, precluding connection of
VGA-0. Now the root window
has only one segment, and the greeter is on
it. Whew!
A big advantage of the Raspberry Pi over the typical firmware
setup
in an ARM-based cellphone is, if you mess up the software so badly that it will
not boot, you can transfer the SD card to your big machine and do repairs
there; if necessary you can just re-image the card. In all of the uproar
getting the Raspberry Pi working, I had a few untoward experiences.
At a certain point I bricked my machine. The
symptom was, it would go through bootcode.bin, start.elf and u-boot.bin, then
start Grub, which exuded the message Failed to boot both default and
fallback entries
. It then dropped into a Grub shell. The problem was,
while trying to straighten out version skew between Orion, Iris and the
pristine XFCE image, I got Iris' /boot/efi/EFI/BOOT/grub.cfg onto Orion, and it
gives the UUID of the root filesystem, which is on Iris, not Orion. Thus
Orion's Grub could not read Iris' root filesystem to find /boot/grub2/grub.cfg
(not to mention the kernel and initrd specified in grub.cfg), and things went
downhill from there. To discover the correct UUID, insert the SD card in your
big computer and do ls -l /dev/disk/by-uuid/
, and look for the symbolic
link to ../../mmcblk1p2 (assuming you have the usual root filesystem on
partition 2). The 1-component filename of that file, e.g.
edf0b932-eb7e-4c54-91be-fd7861e59783, is the UUID you need. When I edited
Orion's /boot/efi/EFI/BOOT/grub.cfg with the UUID of its own root partition,
it once again could boot.
I had a lot of trouble getting the basic boot parameters right, with the result that the X-Windows server would not start, or the RPi would go into a bootloop. How to recognize a bootloop: When you turn on power, the red light comes on, the green light gives a few irregular flashes, then it waits for (I think) 2 seconds, then repeats the same flashes, forever. Just turn off power, transfer the SD card to the big computer, and revert whatever destructive change you just made.
rpm -qa | sort -o $j/rpm.all.xfceimage -- original package list.
Download a more recent installation ISO image into /s1/SuSE/SuSE-build/aarch64/99.8/iso/ and make a symlink in that directory from openSUSE-Tumbleweed-DVD-x86_64-Current.iso . You might want to try the network installer too, if we've figured out how to boot it. (Actually I haven't found a reliable way to get updated packages from the download site, but to prefer the ISO for equal versions.)
Add an item in /etc/fstab to mount the above DVD image on
/s1/SuSE/SuSE/aarch64/99.8 . This is on Diamond, the distro mirror.
Sample fstab row:
/s1/SuSE/SuSE-build/aarch64/99.8/iso/openSUSE-Tumbleweed-DVD-aarch64-Current.iso /s1/SuSE/SuSE/aarch64/99.8 iso9660 ro,loop 0 0
Move /home/post_jump/byhg/v99.8/etc/zypp/repos.d to a new directory, /home/post_jump/byhg/v99.8@x86_64/etc/zypp/repos.d . Create an analogous directory for aarch64. Edit the repo definitions like this:
portssub-repo for Tumbleweed on ARM, but as of 2018-09-xx (probably mid-August, actually), the regular SuSE distro supports aarch64.
My enterprise repo until now has only had x86_64 and i586 (Intel) packages. It's going to take some work to make the installation scripts switch correctly between those and aarch64 (ARM).
Adding the local USB memory stick as a repository.
Verifying the media. We're still in yast2.
These packages need to be installed: checkmedia. It will have to come off the media that's going to be checked :-) Hit Install. It finishes quickly.
Check ISO File. It insists on an extension of .iso .
ln -s /dev/sda /tmp/media.isoand try checking that. Amazing, it didn't notice that it's not a plain file.
Initial security setup:
I've deleted several pages of notes about diagnosing the Ethernet problem, because the problem was never with the network; it was with USB power.
I'm going to do subsystem testing on the XFCE image as installed (with only minor tweaks for usability on my net). Then I'm going to try upgrading it directly to the current Tumbleweed with my package selection. If this is botched, I'll just reinstall the XFCE image and try again.
How do I test the memory? While memtest86+ is available for Intel (x86 and x86_64) CPUs, there is no corresponding program for ARM. But U-Boot has some commands involving memory testing. See this link for memory testing options in U-Boot.
get_ram_size includes a very fast memory tester (therefore not thorough) to determine the presence of memory ranges, and as a side effect it also detects defective memory. It is supposed to be called on every boot action.
The mtest command is useless and is now deprecated: It's slow, and the out of the box range setting is very often bogus, causing either false positives from testing memory that isn't really there, or "testing" (i.e. trashing) the U-Boot code with fatal results.
There is a POST feature that tests memory, which has to be enabled at compile time.
The author points out that if you test by reading and writing memory one word at a time, assembly defects like nonsoldered pins/balls will show up, but it will not detect dynamic effects, such as botched DMA transfers and cache flushes, which are more common and harder to diagnose. He recommends an application-level test, like compiling the Linux kernel.
At present the hacked configuration files are in /home/post_jump/$VERSION (mostly) and /home/post_jump/byhg/$HOSTGROUP, where the latter can include @$VERSION (intersection). There are various scripts that depend implicitly on this directory structure. But architecture-dependent files, like the repo definitions in /etc/zypp/repos.d, are handled poorly, and in particular the x86_64 repos would either not be excluded from the ARM machine(s), or would not be found at all for the x86_64 machines. So I'm going to make everything based on hostgroups.
On CouchNet I have a configuration file that defines sets of hosts, and a
program hostgroup
that takes an expression such as x86_64@virtual (@ for
set intersection) and emits its members on stdout; there's also a Perl API.
Numeric version hostgroups are like v42.1, and I'm using v99.8 to represent
Tumbleweed.
The new paradigm will go like this: The files that should be the same on machines of all versions and architectures go in /home/post_jump/byhg/all. /home/post_jump/byhg/v99.8 (and other versions) becomes the main version-specific directory. /home/post_jump/current is a symlink that indicates the current default version; formerly it pointed to 99.8 (in the same directory) but this will change to byhg/v99.8 . Sample bash code: opt_R=$(readlink ./current); opt_R=${opt_R##*/v}; This works on both the old and new values for ./current .
These scripts rely on the post_jump directory structure:
/home/post_jump/sync_jump -- Copies between the target host and the master configuration file copies; it figures out the hostgroup subdirectory. The bidirectional feature is new. [Done.]
/home/post_jump/pjdiff -- Compares a configuration file with
what's on the target. Used to use current
and
echo [0-9]*
to get a list of valid versions. [Done, using
hostgroups instead.]
/usr/diklo/sbin/audit-repos -- Copies repo definitions onto the target machine and edits the architecture and URL. Changed to find the master copy through hostgroup membership. [Done.]
/home/post_jump/findpj -- Makes a list of configuration files
that should be on the target. Converted to use byhg
.
/usr/diklo/sbin/post_jump -- Uses current
.
Converted it to use sync_jump instead of pushconfig.
Appears to be working correctly now.
/usr/diklo/sbin/instsetup -- Installs on the target a chroot jail
with the new version's zypper, and just enough infrastructure to run
it. This was needed one time when they changed the compression algo
in the RPM files, and also when we wanted to change a bunch of hosts
from i586 to x86_64, which post_jump can't do. Uses current
.
Not updated; I have to do that if I want to use instsetup in the future.
/home/post_jump/pushconfig -- Copies conf files from the master to
the target host. Uses current
and byhg
. Deprecated, use
sync_jump -p -c -a
instead.
/home/post_jump/42.1/boot/message.114 -- Background image for the booter in a long-obsolete format. Toss. Also /home/post_jump/99.8/boot/message.114
/usr/diklo/sbin/audit-suse -- Ancient, uses the directory structure from before the old one. Toss. Use /usr/diklo/sbin/audit-pkgs instead, which is autonomous (no configuration files).
Due to issues sharing the monitor, I need to set up remote access, and not just ssh: I need a complete desktop. I've been pleased with RDP on Windows, using Remmina as the client, and I'm going to take this opportunity to evaluate RDP for Linux.
I first tried xrdp. However, the RDP server was not found and I ended up with the Xvnc server (managed by xrdp, and on the ms-wbt-server port, i.e. RDP). There is no indication in documentation or forum postings that it uses other than the RFB (VNC) protocol, though. It performed reasonably, about 5FPS for glmark2.
When I selected the Xorg session, it loaded /usr/lib64/xorg/modules/libxorgxrdp.so which evidently uses the authentic RDP protocol to communicate with the client. It starts off initially with 640x480px and 800x600px, but eventually resizes the screen to the requested 1280x960px. The frame rate was worse, estimated 1FPS for glmark2.
I tried the console
session. It asked for a password (no userID),
and tried to connect to a VNC server, which was not running.
Trying neutrinordp-any. It wants an IP address, port number (prefilled with 3389 = ms-wbt-server, loginID and password. Error loading libxrdpneutrinordp.so, try lib=libxrdp-vnc.so in xrdp.ini. (I didn't follow this up.)
Now, how do we get a decent graphic benchmark? Here's a short tutorial, How to benchmark your GPU on Linux by Bill Toulas (date not obvious). glxgears is good as a quick test if your graphics is working, but all modern graphics cards get 60 FPS (locked to vertical refresh), so it's useless for comparisons. glmark2 has a rich set of tests for OpenGL ES 2.0. It includes a Wayland tester. Unigine is mainly a proprietary package for professional tests, but they have four free game worlds any of which will provide an extensive and thorough test of game-type performance. I'm going to install glmark2. It's on SuSE Build Service. No dependencies.
For glmark2, the default window size is 800x600px. Full screen, or an
arbitrary size, can be set. It also has a run forever
mode, for battery
testing.
During the test, the RPi draws 5W. It's not clear how much work was being done by the GPU vs. CPU but it's supposed to be using the GPU as much as possible. Final score: 17, compared to 1831 on Xena. It looks like the average FPS over all the 33 tests. Glmark2 is set up to use 10 to 15 secs per test, however many frames can be shown in that time. It took 6 mins on Xena. Via RDP (Xorg server), the average score was 11; it took 7.5min; and the displayed image was limited to about 1 FPS by network delays. Via Xvnc server the average score was 10, but the displayed image had a much higher frame rate, around 5FPS. Several tests did not finish within the alloted time and got a score of 0. This was all with RDP quality set to Best. These must have been all in the CPU without GPU acceleration. Network speed would have limited the perception of quality, but would not have slowed down rendering.
I need to make progress on this project from a remote location for a week. When I hork my RPi, the procedure is to pull the power plug, remove the SD card, stick it in the card slot of my laptop, fix (ranging up to re-imaging the card), and then reassemble the RPi. These are hands-on operations and I have no robot to do them for me. The obvious solution is to use a virtual machine. I already have a choice of three VM hosts, so it should be a piece of cake. Famous last words.
This project so far has not produced a useful virtual machine. Lessons learned:
Web resources:
ARM Lab VMis a preconfigured VM that should do something.
Initially I followed the Azeria howto. The image referenced there did boot, though with useless networking (in my context), and provided a standard-looking version of Raspbian dated 2018-04-18 (recent) based on Debian Stretch and kernel 4.9.59.
But I never did get the network into bridge mode, with the result that I can't use my normal administrative procedures to install OpenSuSE Tumbleweed on it. And the point of this exercise is to get those procedures working on the new architecture.
I tried using libvirt, because I know how to make bridge mode work there. I worked in parallel with the qemu command line, moving successes in one framework over to the other one. After chasing my tail for a long time, I got a set of options that libvirt would accept and that qemu would also accept. But under libvirt the VM started up, with its vnet interface attached to the bridge, but it hung with 100% CPU utilization, not having gotten far enough to initialize the display. Under qemu directly it did the same thing except with zero CPU.
My impression is that Linux for Intel has a lot more interoperability among new and historic chipsets than Linux for ARM.
A key insight mentioned in a forum post: KVM uses host hardware features to accelerate operation of the virtual machine, which therefore must be running on the host architecture, not necessarily an exact match but at least in the same product family. In your libvirt XML, when the VM is close to the host architecture, you need to set domain type='kvm', and emulator qemu-kvm. Whereas for an alien architecture you need domain type='qemu', and emulator qemu-system-arm.
Seen in /var/log/debug when booting: the kernel alleges that it is turning on KVM host virtualization. That is, your Raspberry Pi could be the host of a virtual machine using the KVM framework. So it says.
Since I'm back from my trip, I'm sawing off this sub-project.
All attempts to boot the SuSE installer variants failed, with the video off and catatonic behavior from the USB memory stick. It's going to take the serial cable to straighten this out. (It's really going to take sane power distribution and a FAT32 filesystem to straighten this out.)
Wiki page about serial cable on ELinux .org.
Adafruit's tutorial on the serial port.
On the Raspberry Pi 3B you need a line in boot/config.txt saying enable_uart=1 . More recent SuSE guidance is to put local modifications like this in /boot/efi/extraconfig.txt . Recent (i.e. post-2015) versions of the booter will obey config.txt in both the boot (FAT) partition and the Linux partition. (I haven't verified this personally.) start.elf is the component that interprets config.txt. Some forum posts suggest that on Pi 2 and original Pi, the UART is enabled by default.
The instance of ./config.txt that came from raspberrypi-firmware-config-2018.04.16-1.1.noarch.rpm already has enable_uart=1 .
My serial cable has a Future Technology (FTDI) UART to USB chip hiding in the USB connector, and appears to the host (laptop) to be a USB TTY. At the client (RPi) end there are three wires with flea clips:
The original Raspberry Pi and Pi2 have 26 pins for GPIO; the Pi3 has 40 pins, and this is the one being described. The GPIO connector is in two rows along the left side. For this description, count pins along the leftmost row from the left tail corner as #1, and the tail-most pin in the other row is #2.
To connect the serial cable you have to leave the top of the case off.
Plug the serial cable into the client. On my distro the TTY
appeared as /dev/ttyUSB0 . The tutorial author prefers screen
as the client program, and these are the command line options:
screen /dev/ttyUSB0 115200
The second parameter is the baud rate of the UART. You may need to press Enter to get a getty prompt.
Unfortunately the serial cable did not reveal any hidden messages from the SuSE rescue system. Nonetheless I'm going to leave it connected, in case it will be useful for future debugging.
In this re-try I want to accomplish several steps:
Make up a permanent
post-post-jump package that can be
copied onto a new Raspberry Pi (or other machine, actually), including
these items. Several of them should be handled as actual configuration
files instead.
On the SD card, replace the MBR partition with GPT and see if it boots. Also Grub will have to be reinstalled. The SD card is going to get wiped, so now is the best time to do this test. If GPT works, use it from now on. No it didn't boot. I used the same procedure to revert to a MBR partition table (mktable msdos) and reinstall Grub. It boots again, proving that the partition content was not trashed. Conclusion: Even though the boot ROM may be able to read bootcode.bin off a card with a GPT, something further along can't handle it.
UEFI on Top of U-Boot
by Andreas Färber and Alexander Graf
of SuSE (no date, sometime in 2017).
All SuSE OS products use Grub as the sysadmin-accessible bootloader, and the UEFI flavor of Grub to actually load the kernel. This is for Intel, AMD, Power, and IBM zSystem. And now for ARM as well.
Hardware vendors tend to create board-specific forked Linux distros, with all their vendor lock-in and late or missing security patches. Distro vendors similarly need board-specific releases. This urgently needs to be improved.
U-Boot broadly supports ARM SoC's, and SuSE decided to implement a UEFI compliant booter within U-Boot.
At the time of writing (u-boot v2017.01; we have u-boot-rpi3-2018.03), the UEFI booter was known to work on 12 popular ARM SoC's and their boards. OpenSuSE images have been updated to use the UEFI booter.
The boot sequence now goes like this:
kernel=u-boot.bin, which it execs. This is most likely running on ARM but it's a boot block, not a standard executable format.
Command line to reinstall Grub. This can be done on a non-ARM CPU,
e.g. your Intel laptop. The -v option produces a lot of output about
probing for LVM, dmraid, etc. etc., none of which we have, and a line
for copying every file. You may want to omit -v. Capture this output
with a |& tee /tmp/grub-output
motif. Be careful to
correctly identify the device whose MBR you are trashing.
mount /dev/mmcblk0p2 /mnt # Be sure this is your RPi memory card
mount /dev/mmcblk0p1 /mnt/boot/efi
grub2-install -v -d /mnt/usr/lib/grub2/arm64-efi --boot-directory /mnt/boot --efi-directory /mnt/boot/efi --no-nvram --target arm64-efi /dev/mmcblk0
Try again to get the SuSE installer onto a USB stick. When booting it, the RPi will boot from the SD card first, so it will probably be necessary to wipe the card (this is legal). Then, of course, install Tumbleweed. Unfortunately progress with USB booting did not translate to progress booting the SuSE installer. The installer most likely is an ISO-9660 filesystem image, which is completely useless for bootcode.bin.
Once again, overwrite the SD card with the SuSE XFCE image.
The final step will be to see post_jump run with no hassles, and with the machine booting afterward.
Test hibernation (S4) on RPi. When I did systemctl suspend
(S3), it instantly blanked the screen and cut off the net. Power
cycling brought it back. When I did systemctl hibernate
(S4) it
blanked the screen right away but took about 40 secs to take down the
net. On rebooting, it did not load the saved image but did a normal
reboot.
For a normal systemctl reboot
or poweroff, it takes about 22
sec until the net shuts off, but on the way down it gets an oops, shows
a backtrace, and announces that it will reboot in 90 secs.
Internal error Oops - SP/PC alignment exception: 8a000000 [#1] SMP
Call trace, first 5 items are __do_softirq, irq_exit,
__handle_domain_irq, bcm2836_arm_irqchip_handle_irq, el1_irq,
arch_cpu_idle.
After the 90 second timeout it says, unable to handle kernel paging request at virtual address 20029910.
This definitely has something to do with interventions to get the display working; in earlier configurations (not recorded reliably) it would reboot successfully.
I tried stopping the Bluetooth btattach process before the
reboot. It got a different oops (no descriptive text), and the
call trace showed:
virt_efi_reset_system, efi_reboot, machine_restart, kernel_restart,
SyS_reboot, el0_svc_naked
It sits there for 23 secs, then the watchdog barks but it dies
immediately; call trace items are
pep_set_access_flags, __handle_mm_fault, handle_mm_fault,
do_page_fault, do_translation_fault, etc.
I tried never having started Bluetooth including never having loaded its firmware. This time after 8 sec the net went down and the screen got scrambled.
Knowing what I know now about RPi booting, I hope to give the virtual machine another try. A key point is, the VM does not have a BroadCom VideoCore-4 graphics engine, which is what runs bootcode.bin, so the whole business with bootcode.bin and the device tree will have to be bypassed.
The graphics usually fails with a variety of symptoms. In the most recent
incarnation, when display-manager.service starts, it successfully displays the
background image for the greeter, then maunders resource temporarily
unavailable
and dies with a blank screen except for a text cursor. In
addition, when the machine is rebooted or halted, when it has finished the
whole shutdown procedure (in this incarnation) and announces reached target
shutdown, beginning reboot
, it gets a kernel oops with different
diagnostics on different reboots, none seeming relevant. Quite a lot of
interventions (not recorded here in detail) lead to these conclusions:
Baseline: The XFCE image dated 2018-04-30 will boot cleanly, will use the display normally, and will shut down or reboot cleanly. Its display manager is lightdm.
The upgraded OS botches both the display and the reboot. Cases have been seen where the display worked, but I'm unable to reproduce them now. In those cases there was still an oops on reboot.
All the files in /boot/efi are identical between the failing OS and the XFCE image, with these exceptions:
No improvement happened when I changed the kernel command line to be byte for byte identical to that in the XFCE image (in /boot/grub2/grub.cfg) and removed /boot/efi/extraconfig.txt .
Failures were equal with or without the USB boot bit turned on. Booting is from the SD card anyway (/dev/mmcblk0).
Conclusion: the problem is not with misconfiguration of the GPU. There could still be problems in that area, but they are not causing the fatal outcome.
Next try will be to restore all packages that were removed during the upgrade. Restoration was uneventful. With all those packages added, the RPi failed equally: display-manager died after showing the background, and an oops after stopping all services and starting the reboot.
Removing all packages that were installed during the upgrade (excluding those that were upgraded). Again, deletion was uneventful, and there was no change in behavior: display-manager died after showing the background, and an oops after stopping all services and starting the reboot.
I've set up post_jump so it can stop installation after installing configuration files. Steps to use this:
OK, that strategy was effective in pointing attention at the actual problem.
There are four display managers involved:
In the XFCE image, the display manager is lightdm, enforced by:
update-alternatives --install /usr/lib/X11/displaymanagers/default-displaymanager default-displaymanager /usr/lib/X11/displaymanagers/lightdm 15
I'm not sure what priority they used; it's higher than 15. This works, no complaints from the X-Server.
When jimc's /etc/X11/xdm configuration and startup scripts are
used with lightdm, the display manager (i.e. the greeter) dies saying
resource temporarily unavailable
. I have no clue what this
resource may be.
I added a SuSEconfig script (remember SuSEconfig, which was replaced by %posttrans scripts around SuSE 12.2?) It reads /etc/sysconfig/displaymanager, runs update-alternatives --set, and selects what DISPLAYMANAGER tells it to. This works, xdm is selected, and it appears to behave normally.
Orion is now fully functional, including xdm on the display and no crashing when rebooting. With one exception: Bluetooth is disabled (in case it might have been causing the crashes).
I'm declaring the display problem solved. I will continue with xdm (until I recompile mdm from source), and I will continue with copying exactly the XFCE image's GPU memory configuration, i.e. cms=300M and no other CMS parameters.
As for the crash on reboot: there are two suspects, Bluetooth and sound. For quite a while, the RPi could be rebooted without crashing, but just when installation issues were fixed and I went on to investigate the crashes, it started again. On another machine, rebooting soon after taking it down had a bad effect, but in this case, an 8 hour wait did not prevent crashing. I'm going to try one test in each of four conditions:
Given that the Bluetooth and Wi-Fi are integrated, could the Wi-Fi driver be a problem? Its driver is brcmfmac. I blacklisted the driver, and the outcome was worse than before; it could not chvt 1, which it could do consistently before, and hung at an unknown point in the shutdown process.
I suspect there is no precise causal connection between these various interventions by loading or blacklisting different drivers: there is some entirely different issue involving mismapped memory, and the various loaded drivers move different pieces of code into the kill zone.
I'm convinced that the XFCE image is defective, and I want to track this down. I see these symptom clusters. vchiq is an actual module name; vc4-drm is not a real module but appears in kernel messages. It is probably a hybrid of the real modules drm and drm_kms_helper.
resource temporarily unavailableand dies. Upon reboot the kernel oops happens.
We have these clues:
Action plan:
Again copy the XFCE image onto the SD card. This is openSUSE-Tumbleweed-ARM-XFCE-raspberrypi3.aarch64-2018.04.30-Build2.3.raw.xz
Copy ./local to the image, with the SSH host key. Use the -c option
since some of the keys have different content but identical size and
date.
./rsync -a -c ./local/ orion:/
Tidbit: The XFCE image has grub and the USB keyboard sometimes is effective in its UI (unlike on any other configuration). Once you have booted and it has modified the partitions and whatever else it does, the USB keyboard no longer functions.
Boot it up. Check its ability to reboot. Yes, it doesn't crash. The net comes up 160 sec (2.5 mins) later and sshd is running 25 sec after that.
To snoop on the root window (with LightDM):
DISPLAY=:0 XAUTHORITY=/run/lightdm/root/:0 xwd -root | display -resize 640x480 xwd:- (takes about 10 secs)
Or if xdm is the display manager:
DISPLAY=:0 XAUTHORITY=$(echo /var/lib/xdm/authdir/authfiles/A:0*) xwd -root | display -resize 640x480 xwd:-
There is no /boot/efi/extraconfig.txt or commandline.txt. config.txt has gpu_mem=32 but no other relevant GPU parameters. From /var/log/Xorg.0.log, it is using /dev/dri/card0, modesetting driver, AccelMethod None, AIGLX: reverting to software rendering. relevant command line options are swiotlb=512 cma=300M; complete command line is:
BOOT_IMAGE=(hd0,msdos2)/boot/Image-4.16.6-1-default loglevel=3 splash=silent plymouth.enable=0 swiotlb=512 cma=300M console=ttyS1,115200n8 console=tty root=UUID=1dcac347-43ab-40d6-9a43-1e3420e72697 rw
Run post_jump but stop before installing modified config files (-P 3). Thoroughly check that we're still in state A. Yes it rebooted. config.txt, X-Server, command line are as in the previous paragraph. Lightdm greeter is running.
Pick out config files that seem irrelevant, and install them. Check
if it's still in state A. Repeat until one or more files are found
that hose the machine. Command lilne:
/home/post_jump/pjfind -F 2 -A orion > output
Restart procedure: If it doesn't crash, net can be up in 160 secs.
chvt 1
systemctl reboot
(It gets the oops 20 sec later, with a botched watchdog 30 secs after)
Power cycle using Domoticz. Allow 20 secs before turning on.
(Net is up 3 mins later incl about 1 min for a problem bringing
up the swap device, which times out.)
sshd is running 25 secs later.
Greeter is up 30 secs after that.
First tranche of config files: The display-manager is not running. The X-Server came up, but was shut down when the display-manager died. The kernel command line is identical to the pristine one.
/var/log/lightdm/seat0-greeter.log says: Error writing X authority:
Failed to open X authority /var/lib/lightdm/.Xauthority: Permission
denied (duh). That's what is screwing up lightdm, I think. It and its
containing directory are owned by 472:474 = lightdm:lightdm. On
CouchNet the numeric U/GIDs are 116:116. And there's no
/etc/permissions file to enforce the permission. Needs bug report. I
added this directory,/var/lib/lightdm-data, and all contained items to
/etc/permissions.local, and re-ran chkstat --system --set
.
Lightdm starts up now.
Will it reboot? It got the net up in 70 secs. Same speed when shut down and power cycled. Lightdm and the X-Server are running. /boot/efi/config.txt and /proc/cmdline are the same as before. I would say we're in state A.
Next tranche: jimc's hacked /etc/X11 stuff. This shouldn't cause
any crashes… Now display-manager gets resource temporarily
unavailable
. /var/log/lightdm/lightdm.log says /etc/X11/xdm/Xsetup
had exit code 1. Reason: it's trying to display
/m1/custom/background.jpeg on the root window, and it looks like
lightdm is also putting its own background there in a way that prevents
Xsetup from overwriting it. I modified Xsetup to not do that for
lightdm. However, /etc/sysconfig/display-manager includes
DISPLAYMANAGER=mdm which should be lightdm. I wrote
/usr/diklo/lib/daily/disp_mgr.J to keep it in sync. Looks like that
whole problem is now fixed.
Next tranche: Broadcom firmware. The XFCE image already has everything in /lib/firmware/brcm as well as /lib/firmware/BCM43430A1.hcd . Nothing was transferred.
Last tranche: /etc/default/grub and .m4, with likely a bogus CMA parameter. Rather than installing this, let's modify the master copy to duplicate what works on Orion.
It looks to me like I now have a configuration that works.
Famous last words. After post_jump, the crash on reboot is back.
Let's remember: the XFCE image being used here is openSUSE-Tumbleweed-ARM-XFCE-raspberrypi3.aarch64-2018.04.30-Build2.3.raw.xz
The previous attempt did not result in a working installation, but
the finger of blame points at the EFI boot files, specifically
/boot/efi/EFI/opensuse/grubaa64.efi is present in the version that fails,
but completely missing in the pristine image, which appears to use
/boot/efi/EFI/BOOT/bootaa64.efi (which is also present in the other
image but I'm assuming it's unused). grubaa64.efi appears when you run
grub2-install /dev/mmcblk0
.
To reimage the SD card I did these steps:
At this point it was in state A, i.e. everything works and you can reboot without crashing.
I executed grub2-install /dev/mmcblk0
. This image has a MSDOS (MBR)
partition table, hence error messages about a botched GPT, which evidently
count as no error reported
. Here's the output:
orion:~ # grub2-install /dev/mmcblk0 |& tee $j/grub.log
Installing for arm64-efi platform.
GUID Partition Table Header signature is wrong: 0 != 5452415020494645
GUID Partition Table Header signature is wrong: 0 != 5452415020494645
GUID Partition Table Header signature is wrong: 0 != 5452415020494645
GUID Partition Table Header signature is wrong: 0 != 5452415020494645
GUID Partition Table Header signature is wrong: 0 != 5452415020494645
GUID Partition Table Header signature is wrong: 0 != 5452415020494645
Could not prepare Boot variable: Invalid argument
Installation finished. No error reported.
Now rebooting: it rebooted without crashing and got the net back up in 70 sec, which is normal behavior. Remember that this is under the influence of grub from the pristine image, e.g. EFI runtime services. /boot/efi/EFI/opensuse/grubaa64.efi is now present.
Now the real test: reboot it again. Unfortunately it reboots with no visible problems. Twice.
I'm going to take this opportunity to try the GPT again. We have a near-pristine image with a MSDOS partition table and a SuSE EFI booter. Now on the laptop I am converting it to a GPT. It did not boot.
Trying the same maneuver on a truly pristine image. It didn't boot either.
The HCL has instructions for creating a hybrid MBR/GPT using program gdisk from the gptfdisk package. After I converted the MBR into a GPT, it reports that I have a protective MBR and a GPT. Commands:
OK, it booted. Then I tried rebooting. It went down OK, but hung with a blank screen. Conclusion: the promised booting from GPT is not really working, and I'm going to have to give this up pending future improvements.
There's a newer image, which I'm trying, dated 2018-05-11. Filename: openSUSE-Tumbleweed-ARM-XFCE-efi.aarch64-2018.05.11-Build1.1.raw.xz This image is fully compliant with SuSE's standards:
I have been dragging my heels with btrfs because I would need to learn a lot about it. SuSE tends to put directories like /var in sub-partitions with an upper bound on size, which is a good idea, but I don't know the details. Anyway, I'm going to try out this new image.
Prerequisite: I need the btrfs utilites, package btrfsprogs, plus the recommended dependency btrfsmaintenance. We get snapper also. And libreiserfscore0 (why?) It's enabled these new services: btrfsmaintenance-refresh.service btrfsmaintenance-refresh.path btrfs-balance.timer btrfs-defrag.timer btrfs-scrub.timer btrfs-trim.timer . I'm going to toss btrfsmaintenance, not having any permanent btrfs filesystems on my laptop. And it rebuilt my initrd's with btrfs support.
btrfs no longer has a fsck module that works. It prints a message, use the check subcommand of the btrfs program. (Tidbit: you can convert a ext2-3-4 filesystem to btrfs in place using the btrfs-convert utility.) See the btrfs-check man page. Command line: btrfs check -p /dev/mmcblk0p3
Installation steps:
Now installing the new XFCE RPi image dated 2018-05-11, filename openSUSE-Tumbleweed-ARM-XFCE-raspberrypi3.aarch64-2018.05.11-Build1.1.raw.xz It boots. (USB keyboard is inert.) Looks normal except that it failed to get a DHCP address (IPv4 or 6). I added those manually. Now running post_jump. Discreps:
Booting the RPI:
Starting Reboot). This time it didn't get stuck on the swap device.
Web resources found:
Beware: I have the distinct impression that the boot system has evolved rapidly, and instructions that may have been appropriate a year ago may give poor results today.
These are the hardware-specific packages that are required:
I discovered a key item: to make the onboard sound work, you need
dtparam=audio=on
in /boot/efi/extraconfig.txt .
Summary of boot modes:
Normallyit would be in the same device and directory as bootcode.bin. On a running SuSE system it's mounted as /boot/efi, but this is long after the boot process has finished.
I had a lot of trouble getting the basic boot parameters right, with the result that the X-Windows server would not start, or the RPi would go into a bootloop. How to recognize a bootloop: When you turn on power, the red light comes on, the green light gives a few irregular flashes, then it waits for (I think) 2 seconds, then repeats the same flashes, forever.
Here are the config.txt parameters that eventually worked.
Actually SuSE provides an official
config.txt, and it's
recommended to override or supplement things in extraconfig.txt (in
the same directory), which config.txt includes. On the SuSE system
there is a complete copy of all the setup files in /boot/vc/ but the
ones used at boot are in the first FAT partition, which is mounted on
/boot/efi . Occasionally forum posts suggest that
/boot/vc/config.txt will also be honored, but reading and obeying
config.txt is a prerequisite for execing the ARM code that can read
UNIX filesystems. I suspect that something copies all of /boot/vc/
including its config.txt into /boot/efi/ and the latter is the only
instance that has any effect.
Also these parameters need to be coordinated with kernel command line arguments, see next section.
modesettingMesa (X-Windows) driver. A forum post warns that vc4-kms-v3d works but the X-server doesn't like it; I don't know if that's still true in 2018-06-xx.
Matching kernel command line parameters:
Seen in log files:
dmesg output (wherever it gets sent on your system): Look for
messages about the vchiq kernel module. One possibility is
coherent pool not initialized
, if you didn't provide the
coherent_pool kernel parameter. It ends up saying could not
load vchiq … bcm2835_vchiq: probe of 3f00b840.vchiq
failed with error -12
. Only if vchiq loads, can the X-Server
(or anything else) use the display.
In /var/log/Xorg.0.log it should say xfree86: Adding drm
device (/dev/dri/card0)
. If it's sought but does not exist,
your display won't work, and at the end of Xorg.0.log it will say
no screens found
.
Also in /var/log/Xorg.0.log it says AIGLX: Screen 0 is
not DRI2 capable … reverting to software rendering
.
This is not promising for graphics-intensive applications like
games. I don't know (yet?) what to do about this.
With this configuration the RPi boots and the display is normal (though not too swift). But when I try to reboot or shutdown, it gets a kernel oops, not the same every time. Hiss, boo!
I believe I have finally figured out where the culprits are that make the RPi crash on rebooting.
The first step was to keep the post_jumped root filesystem (partition 2), but replace the boot files (partition 1) with the ones in the pristine XFCE image. This is openSUSE-Tumbleweed-ARM-XFCE-raspberrypi3.aarch64-2018.05.11-Build1.1.raw.xz . Most of the files (FDTs and overlays mostly) are identical; these differ:
About EFI/BOOT/earlyboot.cfg: Clearly the image version has to have the UUID of the root partition in the image. I'm guessing without proof that when the initrd expands that filesystem to fill vacant space on the card, it gives the partition a new UUID and sticks it in earlyboot.cfg and /etc/fstab.
With only boot files from the image, it showed a generic grub shell with a command prompt, but showed no sign of having found grub.cfg. Attempted mitigations:
I tried installing post_jump versions with these results:
More speculations on the crash on reboot: The watchdog barks but also crashes (differently) on its reboot attempt. Sometimes the crashes seem similar. I believe they are never byte-for-byte identical. They appear to vary when different drivers are loaded (Bluetooth, Wi-Fi). The stack trace looks tantalizingly plausible, i.e. locations in possibly relevant subroutines are listed, but none catch my eye as smoking guns. My strategy has been to not try to copy down exact trace info since it is variable and probably not too informative. My speculation is that dracut-shutdown.service runs successfully, but then somebody calls EFI Runtime Services to get into ACPI to actually reboot or power off the machine, and this call is botched, either because somebody scrambled the jump address, or because Runtime Services was freed out of memory. I have been having similar problems on my Intel x86_64 laptop with OpenSuSE Tumbleweed, kernel 4.17.1 on GPT: on power off or reboot it hangs with no messages when it would be expected to call ACPI. But with the advent of kernel 4.17.2 it hasn't failed yet (at least 10 tries, cross fingers). So the finger of blame might point not in an ARM-specific direction.
Now that I have a mitigation kludge for the crash on reboot. I once again installed the XFCE image and ran post_jump on it. Discrepancies:
Checking if passwd etc. has been monkeyed with.Yes it has, postfix got kicked out of hostcert. It needs to be put back, but the altered file is kept. [Fixed by hand.]
checkout.sh discrepancies: None significant, and it rebooted without crashing. So this phase has been a success.
Web resources:
Here's a summary of USB host boot modes, mainly from the last reference above:
On the RPi 3, 3B, 3B+ you need to turn this on (irreversibly) by blowing a fuse. Not available on RPi 1 or 2. The situation for future models will be announced when they appear. To turn it on, add program_usb_boot_mode=1 to config.txt (on a SD card) and reboot the machine once. Then remove the program command.
When booting, the boot ROM enables the root USB port and waits a max of 2 secs for a ready signal on the bus. See below for how to extend this to 5 secs, for a slow MSD.
If you got a hub, enable all ports, then recurse on each of them.
If you got a device, send it Get Device Descriptor.
Add to a list of mass storage or Ethernet devices (SMSC 9500 only, i.e. the builtin NIC). Then continue iterating ports.
It will attempt to boot from SD card(s) first, then mass storage devices, then Ethernet.
For each item in the category it will read the partition table (see below about GPT). The first FAT partition that contains bootcode.bin, it will read that file and exec it. (Doesn't have to be the first partition, and I think there could also be FAT partitions that lack bootcode.bin, which will be skipped.) Ether boot obviously is more complicated.
About the partition table format: MBR (MSDOS) is often used but GPT has advantages, the boot ROM can read it, and it is believed to be fully useable for Raspbian, Gentoo, and other distros that read the kernel from the boot partition. But the "kernel" for OpenSuSE is U-Boot, which also runs successfully. It uses its filesystem reading ability to find its configuration file and the real kernel and initrd, in one of the UNIX partitions (successfully). However, as of u-boot-rpi3-2018.09-1.1.aarch64 and earlier, the kernel fails to start, with no error messages.
If your USB MSD starts up slowly, the 2 sec timeout can be extended to 5 sec. Put program_usb_boot_timeout=1 in config.txt and boot the machine (once); it will blow a fuse that the boot code looks at. Then remove that line.
These sectons describe botched steps that were eventually replaced. They are preserved here in case sections may be useful in other contexts.
In the past I downloaded a current ISO image and mounted it on my distro server, so a lot of packages would be obtained from there. With my present distro mirror organization, this is not so useful, plus with Tumbleweed the ISO gets out of date very quickly. So this procedure has been relegated to the outtake section.
mkdir -p /s1/SuSE/SuSE-build/aarch64/99.8/iso (following my usual distro directory scheme). Download URL: http://download.opensuse.org/ports/aarch64/tumbleweed/iso/openSUSE-Tumbleweed-DVD-aarch64-Current.iso The Tumbleweed ISO is 4Gb in size; on my network at 5Mbyte/sec it took 843sec or 14min. Actual name: openSUSE-Tumbleweed-DVD-aarch64-Snapshot20180203-Media.iso . Unfortunately for us tinfoil hat folks, there are no checksum files. (Actually the package and index files have individual checksums, but an overall checksum would be appreciated.) Copied to an 8Gb USB storage stick.
Following the HCL instructions: I'm going to host it on my laptop, which has a card slot. The instructions say to install raspberrypi-firmware-config-rpi3 (and its dependency), copy relevant files to the SD card, and then remove the package, but I'm going to leave it installed for future RPi installations. U-boot is for aarch64, not the architecture on my laptop :-), so you need to extract the content with rpm2cpio. I'm going to leave the package file in /s1/SuSE/SuSE-build/aarch64/99.8/suse/aarch64/ . Search for the current version using the SuSE package searcher, under the name u-boot, and once found, expand the list of 151 sub-packages and pick u-boot-rpi3. The Base:System version is 2016.09.01; the most current one (excluding staging) is 2018.01. I'm going to be brave and use the latter one (265kb).
Since the package was received from mirror.yandex.ru, I wanted to check
the package, using rpm -V -p/net/diamond/s1/SuSE/SuSE-build/aarch64/99.8/suse/aarch64/u-boot-rpi3-2018.01-4.2.aarch64.rpm
.
I obtained the key for the Hardware OBS Project, but was not
able to get it into the correct keyring so rpm could find it. See below
for a more successful checking procedure.
Copy the OpenSuSE ISO image of Tumbleweed onto a USB memory stick.
Actually I was never able to get things working so this image would
become useful.
Recommended command line from the SuSE HCL page:
dd if=[image].iso of=/dev/[usb_key] bs=4M iflag=direct,fullblock oflag=direct
I'm going to describe the configuration that worked, and then summarize failures at the end. Update: I found a better working configuration, detailed after the failures.
I have an IOGear 2-Port HDMI Cable KVM Switch with Cables and Audio (GCS62HU). You connect the shared keyboard (USB), video (HDMI) and mouse (USB) to the unit (I didn't mess with audio), and there are two cable bundles that run to the client computers. It is bus powered, that is, it gets its operating power from the clients' USB buses. It has these features and idiosyncracies, some of which make trouble in my use case:
man in the middle. Other setup options are set with keyboard codes.
This kludge is the combination that I eventually made to work. The powered USB hub used here is the Macally 4 Port Powered USB 2.0 Hub with 5V 2A Power Adapter.
man in the middleinterpretation of mouse actions) has to be disabled (persistent setup) by a keyboard code. The keyboard port is empty (precluding control by keyboard codes; temporarily connect it for setup).
This done, the Raspberry Pi boots, uses the Ethernet NIC (which is on the USB bus), and can communicate reliably with the keyboard and mouse at all stages of booting and operating system use. Including when the NUC is powered up; you can switch focus between the machines with no anomalies noticed.
These variants were non-working:
It's hard to understand the power distribution logic in the hubs. I would expect something very simple: when the AC power supply is plugged in, it is used; otherwise the uplink's bus power is used. However, user-level simple is not necessary simple at the electronic level. After thinking about how to do power disribution physically and meet the price goals, I've come up with a total speculation: AC power, uplink bus power, and client power are all connected in parallel, and the hub does not manage power at all. And the Raspberry Pi is known to have a 5 port hub chip in it (Ethernet and 4 USB-2.0 type A external ports); the micro-USB power connector may or may not also be connected in parallel without management.
This means that whichever power source has the highest voltage will provide all the current. A power supply producing nominally 5V actually produces a fraction of a volt more or less, different for each supply module. If the Raspberry Pi plus the KVM draw more than the rated current of that power supply, you would hope that the supply would let the voltage droop until the other supply starts helping out, or until the load draws within the available current due to series resistance. However, in case of a short circuit or similar damage on the motherboard, this could be hazardous, and some (possibly all) power supplies shut down briefly. The one on the NUC is known to do this, and the BIOS has a setting to head off power supply shutdowns caused by overclocking. The CPU runs at reduced voltage through a DC to DC converter, which has filtering and probably can provide relatively stable power despite weird behavior on the 5 volt side, but a power supply shutdown cannot be good for the USB devices, particularly Ethernet.
This all sounds plausible, except for one unexplained symptom: why does it matter if two vs. one client cable is plugged into the powered hub?
The previous upgrade got into trouble because of missing drivers for Wi-Fi, Bluetooth, and the X-Server. Now I'm analysing the freshly reinstalled image.
/sys/class/net now includes wlan0. /sys/class/net/wlan0/device/driver points to brcmfmac . This driver is loaded, with its dependencies. The device is up, but lacking a Wi-Fi credential, it is not associated with the AP.
/sys/class/bluetooth doesn't exist. I tried loading most of the modules in /lib/modules/4.16.6-1-default/kernel/drivers/bluetooth , excluding vendor-incompatible ones like Intel, Marvell, etc., but none of them caused sys/class/bluetooth/hci0 to appear, as it does on hosts with working Bluetooth.
Gentoo wiki page on 64bit Raspberry Pi. The 3B (the one I have) needs BCM43430A1.hcd firmware, while the 3B+ needs BCM4345C0.hcd . Look in /lib/firmware/brcm . Guess what, I don't have it. The article gives this URL for the 3B firmware, and analogous for the 3B+. Following along in their steps:
/var/log/Xorg.0.log shows that it is using the modesetting X-driver over /dev/dri/card0 . It got the EDID for the monitor on HDMI-1. It is using 1920x1080px at 60Hz (clock 148.5MHz). Reported screen size 476 x 268 mm (at 96dpi, fake). No DRI2, using software rendering. (This was from one of the trials where the display actually worked.)
udevadm info /dev/dri/card0
reveals that the devpath for
the graphics engine is /sys/devices/platform/soc/soc:gpu/drm/card0 .
…/device/driver is vc4-drm . This driver does not exist, but
whatever they're doing with the driver name, vc4.ko exists and is
loaded. Also watch for the absence of error messages initializing
module vchiq.
Conclusion: The missing drivers have been found. However, it's very likely that missing firmware is the issue. I'm going to extract the partition contents without compression, so I can mount them and copy out firmware etc. (Update: For the display, firmware was there but the problem was getting it loaded and correctly configured.)
This setup procedure is valid but is for a use case for which I was never able to achieve the prerequisites.
Following along in the Hardware Compatibility List instructions:
I'm working on the SD card using the card slot on my laptop. It comes out as /dev/mmcblk0. It is already formatted with one fat32 partition taking the whole space.
Partition the SD card with a MSDOS (not GPT) partition table and
one partition 100Mib (100*2^20) bytes in size starting at sector
2048 = 1Mib. (Will it work with a GPT? No, tried and failed.)
Put a VFAT filesystem on it.
parted /dev/$card
mktable msdos (if the card has been wiped)
unit MB
mkpart primary fat16 1 106 --OR--
unit s
mkpart primary vfat 2048 206847
print (check your work)
quit
mkfs.fat -n EFI /dev/${card}p1 (mkfs -t vfat is deprecated)
If restoring saved content from my 32Gb card, add the root (31.4Gb)
and swap (0.5Gb) partitions like this:
unit MB
print (partition 1 runs from 1.05MB to 106MB)
mkpart primary ext4 106 31506
mkpart primary linux-swap 31506 -1s
print (check your work)
quit
mkfs.ext4 -L ROOT /dev/${card}p2
mkswap -L SWAP /dev/${card}p3
Extract U-Boot into a local directory.
mkdir /tmp/u-boot
cd /tmp/u-boot
rpm2cpio /path/to/u-boot-rpi3-2018.01-4.2.aarch64.rpm | cpio -i -d
Alternatively you can force it to be installed like this:
rpm -i --ignorearch http://download.opensuse.org/path/to/u-boot-rpi3-2018.05-22.1.aarch64.rpm
And it ends up in /boot/vc/u-boot.bin (just one file).
Install the Raspberry Pi firmware package on the laptop.
zypper install raspberrypi-firmware raspberrypi-firmware-config
(which provides raspberrypi-firmware-config-rpi3).
Mount the SD card and stuff it with the firmware and U-Boot.
mount /dev/${card}p1 /mnt
cp -a /boot/vc/* /mnt/ #This is the firmware
cp -a /tmp/u-boot/boot/vc/* /mnt/ # The booter, just 1 file
umount /mnt
Connect the Raspberry Pi.
press any keyto hold up the boot process. The USB logo faces down.
Initial power up.
can't find USB descriptor. Without the USB stick, it boots reliably (I think). But you aren't allowed to boot, and insert the USB stick later; it enumerates devices once at the beginning. Tidbit: if you do
usb resetit will re-enumerate the devices. Can't read configuration for 413c:3200 .
I never did get the SuSE installer to boot.
A Raspberry Pi 3B bought in 2018-02-xx boots from the SD card but not from USB devices. But there is a procedure to turn on this feature including PXE boot (cannot be turned off again). I did this procedure and it worked to boot a suitable image.
The installer is packed in an ISO-9660 image, but the boot ROM is looking for a fat32 or fat16 filesystem from which to read bootcode.bin. I am pretty sure (but I don't have this authoritatively) that it can get nothing from an ISO-9660 image.
A much more productive strategy was to load a pre-made image onto the boot media, then upgrade and/or modify it for my needs. It is also feasible to pre-create partitions on the boot media, mount the image on a loop device, and then clone the files out of the image and into the pre-created partitions. Make sure the UUID for the root partition is correct in /boot/efi/EFI/BOOT/earlyboot.cfg , and also, if you're using UUIDs in /etc/fstab make sure they're right.
I never did get the SuSE installer to boot. Here's what I tried:
Inital boot-up attempt
More; also checking media. Once in
Moreyou can't get back to the main menu. Undocumented tidbit: F12 gets you back. On the serial line, not the real keyboard!)
Given my problem with the USB memory stick, I'm going to check the media. This will go slowly. Pretty soon the display goes to sleep and I doubt it's DPMS, but the memory stick is being used heavily. For a few minutes it flashes its activity light as if package files are being read, but then the light goes on solid. After 2.5 hours the memory stick's light is still on solid and there are no messages on the screen. I'm going to try a different memory stick.
With a different USB memory stick (SanDisk Cruzer), it's acting
normally and responds correctly to Hit any key…
Checking the media anyway: Unfortunately the behavior is the same
as with the other memory stick. I can't be sure if the media is OK
as seen on the Raspberry Pi and it just takes a long time to check.
I'm going to cut this off after half an hour and start the
installation.
A key step is to find out the MAC address of the Ethernet NIC and to register it with my firewall. For this I boot the rescue system (under More…) Gakk! Same behavior as for checking media,
Booting the main installer. Same behavior.
The above failures are intermixed with mitigations of the USB power issues, but the final sequence of failed attempts were done with the working KVM/USB configuration, so that's not to blame.
In the HCL page, the troubleshooting section mentions that some monitors behave badly with the VC4 graphics. I tried a different monitor. Did not help, reverting. They also suggested blacklisting the vc4 module on the kernel command line, which would revert to the UEFI framebuffer; however, the initial menu has no way to edit the kernel command line as you could on the Intel installer. My conclusion is that there is something more fundamentally wrong in the boot sequence (which the XFCE image does not suffer from).
Clues from forum postings:
Problems while installing openSUSE Leap 42.3
:
OP sandrosart (2018-01-02) has our symptom. No mitigation ideas.
aarch64 on Pi3
:
OP dukla2000 (2016-09-15) has different but possibly relevant symptoms.
He found that it helps to set video params in /boot/vc/config.txt in the
big partition. A more recent version (of which package?) also obeys
config.txt in the DOS partition.
# Display settings
hdmi_group=2
# Mode 82 is for 1920x1080px (on his monitor)
# See: http://elinux.org/RPiconfig#Video_mode_options
hdmi_mode=82
# hdmi_drive=2 # For sound over HDMI if sender's group is 2, but messes
# up (something).
hdmi_ignore_edid=0xa5000080
framebuffer_depth=32
framebuffer_ignore_alpha=1
hdmi_pixel_encoding=2
Setting up KVM on Raspberry Pi 3 using a 64bit openSUSE Pi3 Leap 42.2
xfce image
:
Blogger Valentine Nwachukwu (2017-03-21) tells how to run KVM on a
Raspberry Pi with OpenSuSE Leap 42.2. An idea: rather than actually
installing, use a preconfigured image.
I'm trying again to build a USB stick with the SuSE installer on it.
Following along in
Create a USB-Bootable aarch64 openSUSE Raspberry Pi-3
.
Step 0 is actually to find out what boot ROM version is already installed.
In this forum post on installing vcgencmd (on Kali Linux, 2015-09-19, OP ivanhertanto, answer by DougieLawson), the recommended procedure was:
cd /tmp #Or whatever directory
git clone https://github.com/raspberrypi/userland
cd userland
./buildme
However, the RPi 3B has a 64bit CPU (aarch64) and the soure code contains assembly code that's specific to arm6l (32bit) and has a lot of casts of a 64bit pointer to a 32bit int; it would not compile.
On a disused 4Gb SD card I put Raspbian Stretch Lite from
the Official
download site (dated 2018-04-18, kernel 4.14, size 350Mb compressed,
1.9Gb uncompressed). Command line:
unzip -p raspbian_lite_latest > /dev/mmcblk0
Warning: make very sure that you are overwriting the
correct block device, the full disc vs. individual partitions.
Decompression took about 180 secs.
After unzipping, partition 1 (EFI) has 45Mb, partition 2 (root) has 1.8Gb, and there is no swap. Boot procedure:
sudofor all commands to be done as root.
sudo parted /dev/mmcblk0: 45Mb EFI, 4.0Gb root. It expanded the root partition to fill the whole card.
Following the procedure in
How to boot from a USB Mass Storage Device on a Raspberry Pi 3
for establishing USB boot mode.
uname -msays armv7l. The boot files were not updated (package raspberrypi-firmware-dt on SuSE; not sure on Raspbian).
sudobefore the command, to elevate privileges.
systemctl poweroff.
The SuSE instructions divert you at this point, but say that if the USB stick doesn't boot, continue in the Raspbian instructions to put the Raspbian image on it. I'm going to be anally retentive and will do that step now. Just like on a SD card, write the decompressed image directly to the raw device, being very careful to get the correct one.
RPi power off. Remove the SD card. Insert the USB stick. Power on. Success, it boots! It had to reboot at least once, after expanding the root partition, which it didn't do with the SD card. It showed the rainbow splash screen, which didn't happen with the Raspbian SD card or any of the SuSE images.
This assumes that you have a Raspberry Pi that you can boot into OpenSuSE. The most likely candidate is the one you just made USB bootable, but actually booting it from its SD card. It will boot from the first device on which it can find bootcode.bin, and the SD card is checked first. Boot it up.
Make sure that recent instances of packages raspberrypi-firmware
and raspberrypi-firmware-config are installed. Do zypper
install raspberrypi-firmware raspberrypi-firmware-config
.
It will install the most recent version, or will tell you if you
already have the most recent version.
Identify the USB stick. Commonly but not always, it will be /dev/sda. Warning: be very sure to correctly identify the drive that you are going to overwrite. Pre-create your partitions. (See the Howto for parted commands.) The Howto says to create a MBR/MSDOS partition table, but other forum posts say that the boot ROM can interpret a GPT as well, and I'm going to try that. Also, the EFI (boot) partition doesn't have to be first; a grub-boot partition may come first. Typical sizes for a RPi with 1Gb of memory:
Parted commands:
unit MiB # 2^20 bytes
mktable gpt
mkpart primary 0 1MiB #Moves start to sector 34, it complains
about misalignment. This is irrelevant on flash memory.
Accept/ignore both.
mkpart primary fat32 1MiB 41MiB
mkpart primary linux-swap 41MiB 1GiB
mkpart primary ext4 1GiB -1s #The latter means to end of disc.
It doesn't like that; it shortens by 33 sectors. Accept.
quit
Create filesystems.
/dev/sda1 (grub-boot) does not get formatted.
mkfs.vfat -n PI1-EFI /dev/sda2
mkswap -L PI1-SWAP /dev/sda3
mkfs.ext4 -L PI1-ROOT /dev/sda4
Clone the running operating system onto the USB stick.
mount /dev/sda2 /mnt
rsync -ax /boot/efi/ /mnt/
umount /dev/sda2
mount /dev/sda4 /mnt
rsync -ax / /mnt/
# (Don't) umount /dev/sda4
Bind-mount /dev /sys /proc into /mnt, then chroot /mnt.
Edit /etc/default/grub to have the new root device, and turn off OS_PROBER. The root filesystem can be identified by label or by UUID. grub2-mkconfig -o /boot/grub2/grub.cfg
Edit /etc/fstab to use the new USB partitions.
Edit /etc/dracut.conf.d/raspberrypi_modules.conf to add USB drivers to be included in the initrd. Execute mkinitrd .
Exit from the chroot jail and un-do the bind mounts. Unmount the USB stick. Poweroff. Remove the SD card. Power on.
Starting about 2017-03-01, at least for Tumbleweed, the images should be bootable out of the box. Just copy them to a USB stick. Index of the aarch64 images (64bit). (Images are also available for arm7l (32bit).) Images are available specialized for a wide range of ARM boards including Raspberry Pi and EFI(?), and also Chromebook in arm7l architecture. There are variants for E20 (not sure what this is), Gnome, JeOS, KDE, LXQT, X11, XFCE.
Details of Installation:
Overwrite the SD card with the SuSE XFCE image.
Took 282 secs.
xzcat [image].raw.xz | dd bs=4M of=/dev/mmcblk0 iflag=fullblock oflag=direct
sync
Mount partition 2 and install local components such as SSH and SSL host keys. You forgot that, didn't you? Now unmount, and transfer the SD card to the RPi.
Turn on power. It boots. SSH is active, but of course has a new host key. rsync is not installed (zypper install rsync). Restore the old host key. Relevant hosts are now able to do ssh and get onto Orion (password required). The root partition size is 30.2 GiB, 25.4 GiB available, 3.2 GiB used. Swap 0.50 GiB. (GiB = 2^20 bytes.)
The default password for root on a SuSE image is linux
.
Change it immediately.
post_jump orion |& tee /tmp/jump.orion
An off-topic tidbit: If IPv6 won't appear, check if Orion has gotten a generic DHCP address rather than its assigned address, which dnsmasq hands out by DHCP. If so, kill wickedd-dhcp6, remove lease-eth0-dhcp-ipv6.xml, and restart wicked. Just restarting wickedd-dhcp6 is not enough, probably because wickedd-nanny remembers the lease.
It turns out that the key to making sound work is
dtparam=audio=on
in /boot/efi/extraconfig.txt .
Picking up with testing after about a two month hiatus.
Power up; shows u-boot messages, Doesn't respond to keyboard, runs SuSE branded grub, Kernel 4.14.15. (Current on Tumbleweed is 4.16.4.)
It lets me on using local files with last year's password. I changed the password for jimc and for root.
It's using wired Ethernet and is also connected to Wi-Fi (CouchNet), so it says. It does have its assigned IPv4/6 address on eth0, plus an IPv6 DHCP address, and a DHCP IPv4.6 address on wlan0, and a privacy enhanced IPv6 address on each, and a mngtmpaddr/noprefixroute IPv6 address on each. The default route is via Jacinth via both interfaces, with wlan0 having a high metric so eth0 always wins.
wlan0 is set for manual activation. So why is it up now? Its driver
is brcmfmac. wicked ifdown wlan0
or ifdown wlan0
both fail
saying device is not configured by wicked yet
.
I'm currently testing sound. We have /dev/snd/controlC0 and /dev/snd/pcmC0D0p . t=/usr/share/sounds/alsa/test.wav ; aplay -D hw:0,0 $t ; it doesn't want to play a wav file; wants format IEC958_SUBFRAME_LE. This is the S/PDIF on HDMI interface from the VC4 graphics engine &mdash there is no sound driver for the analog audio. Raspberry Pi docs for audio suggest using your desktop sound mixer (PulseAudio for me, only S/PDIF), amixer or alsamixer (only S/PDIF), or raspi-config (SuSE doesn't have raspi-config, nor vcgencmd).
Raspberry Pi docs for config.txt (video section) says that if you set hdmi_ignore_edid_audio=1 then it will assume the display has no audio and will use the analog jack. (Actually our display has no audio anyway so this should not be needed.) Well, it still has only the VC4 S/PDIF audio device.
Might be promising: /lib/modules/4.14.15-2-default/kernel/sound/soc/bcm/snd-soc-bcm2835-i2s.ko It loaded, no error messages, but no sound device either. No messages recognizable in the system journal.
Try loading ./drivers/staging/vc04_services/bcm2835-audio.snd-bcm2835.ko i.e. modprobe -v snd-bcm2835 (and it auto loads its dependency vchiq from the same dir). But the second sound card did not appear.
Forum posts uniformly say that they have analog output but there are various problems with the sound such as pops and clicks at the start/end of tracks, and low quality because of 11bit resolution of the DAC. They all recommend using a USB sound module. I have a spare one and that's what I'm going to do.
Remaining items in the Testing page:
Plan:
Model: SD GB1QT (sd/mmc)
Disk /dev/mmcblk0: 32.0GB
Sector size (logical/physical): 512B/512B
Partition Table: gpt
Disk Flags:

Number  Start   End     Size    File system     Name  Flags
 1      1049kB  2097kB  1049kB                        bios_grub
 2      2097kB  35.7MB  33.6MB  fat16                 boot, esp
 3      35.7MB  31.5GB  31.5GB  ext4
 4      31.5GB  32.0GB  515MB   linux-swap(v1)        swap
Trying again to boot the SuSE installer. This is the Tumbleweed DVD on USB. Silence. Trying again with no memory. Silence again. Trying with memory, but wiped. Still dead. Web research reveals that UEFI booting on Raspberry Pi is very experimental, and I think the installer uses UEFI. Let's forget about UEFI for a while. Also /kiwi-hooks/preCallInit.sh says that Raspberry Pi firmware can't read a GPT and the script will use gdisk to switch it to MBR/MSDOS. So this whole approach is probably hopeless until somebody makes a big advance in the boot scripts.
| Planning | Testing | Setup | Collapse | Gentoo | Top |